In the Sep 2022 Windows 365 announcements, we had the alerts features been dropped for Windows 365. In my opinion, it was a much awaited feature for any enteprise that is trying out Windows 365 Cloud PC. This blog post will look at the alerts and their configurations.
Introduction
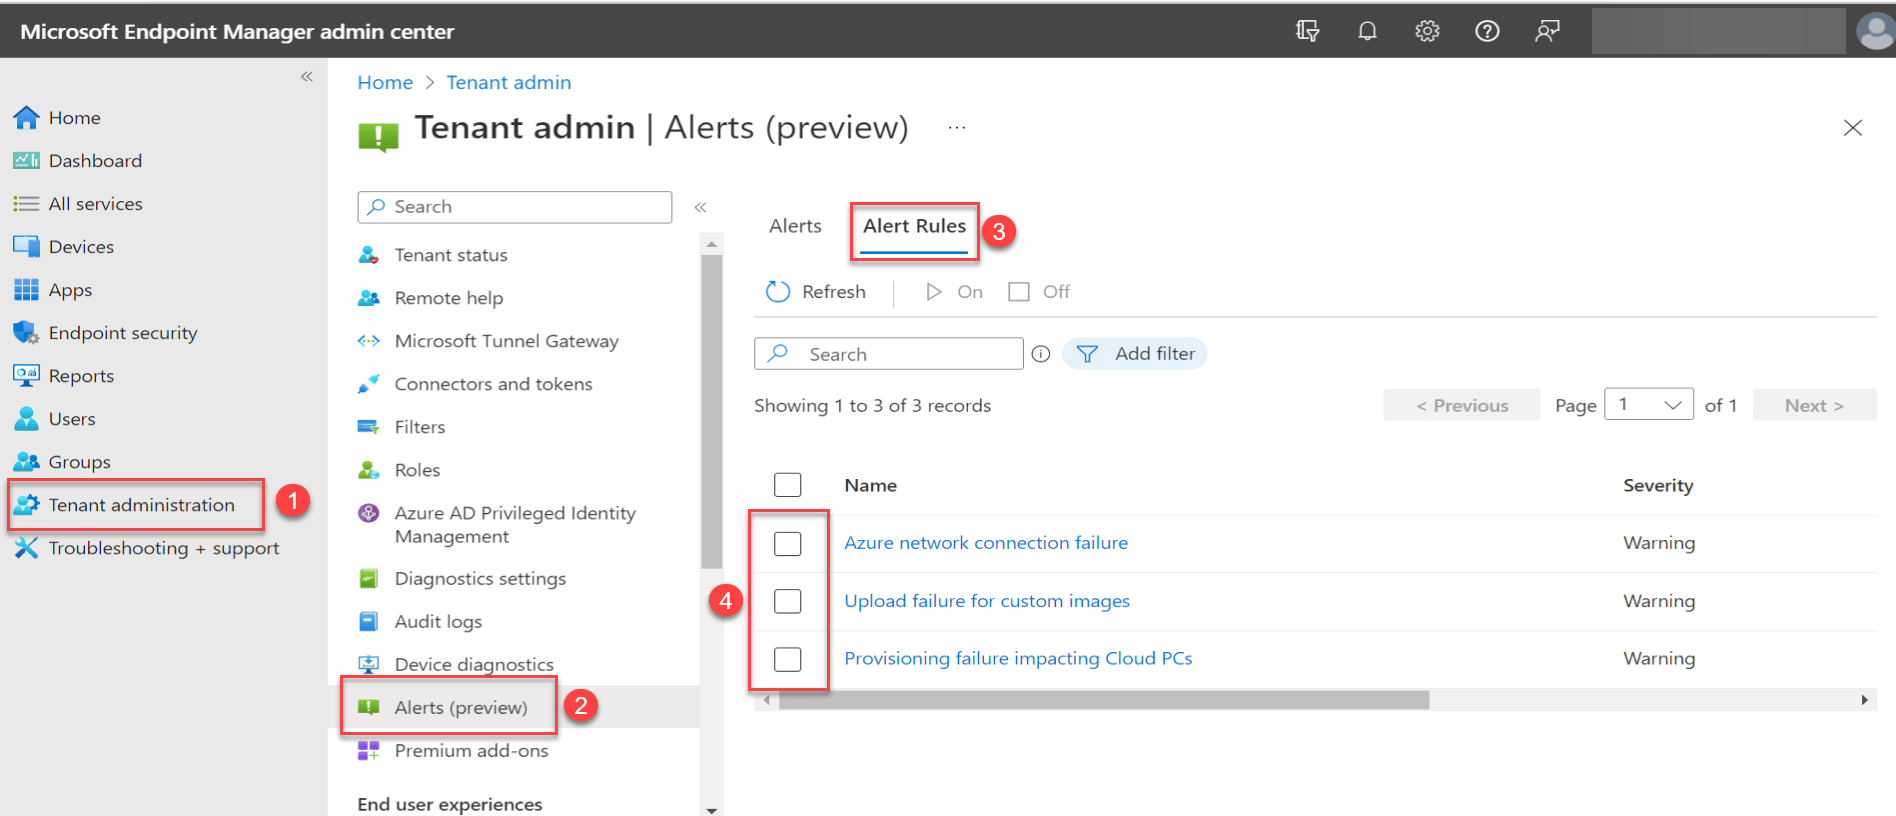
Let’s look at where is this feature available within the portal. Go to your Microsoft Endpoint Manager admin center – https://endpoint.microsoft.com and navigate to Tenant Administration – Alerts (preview) and click on Alert Rules.
Alerts – Windows 365 Cloud PC
Alerts Details
At present, we have 3 alert rules and I am positive more will follow soon as enteprise and customers raise feature request with Microsoft.
Azure network connection failure – Azure network connection checks have failed and are potentially impacting existing Cloud PCs and blocking the provisioning of new Cloud PCs. This alert is typically used when leveraging the Azure VNET to connect the Cloud PC with your on-premise network using (ExpressRoute or Site-2-Site VPN). Knowing if there are issues with the network connectivity is very important as it will block provisioning and other failures.
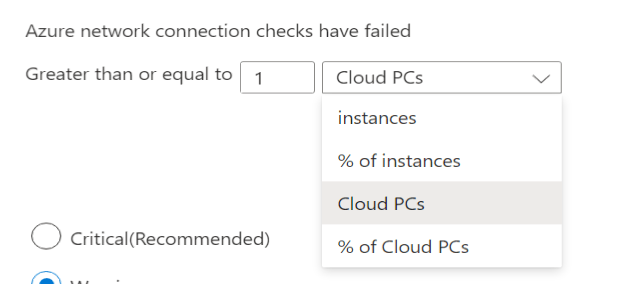
Azure Network connection failureCustomization of the threshold
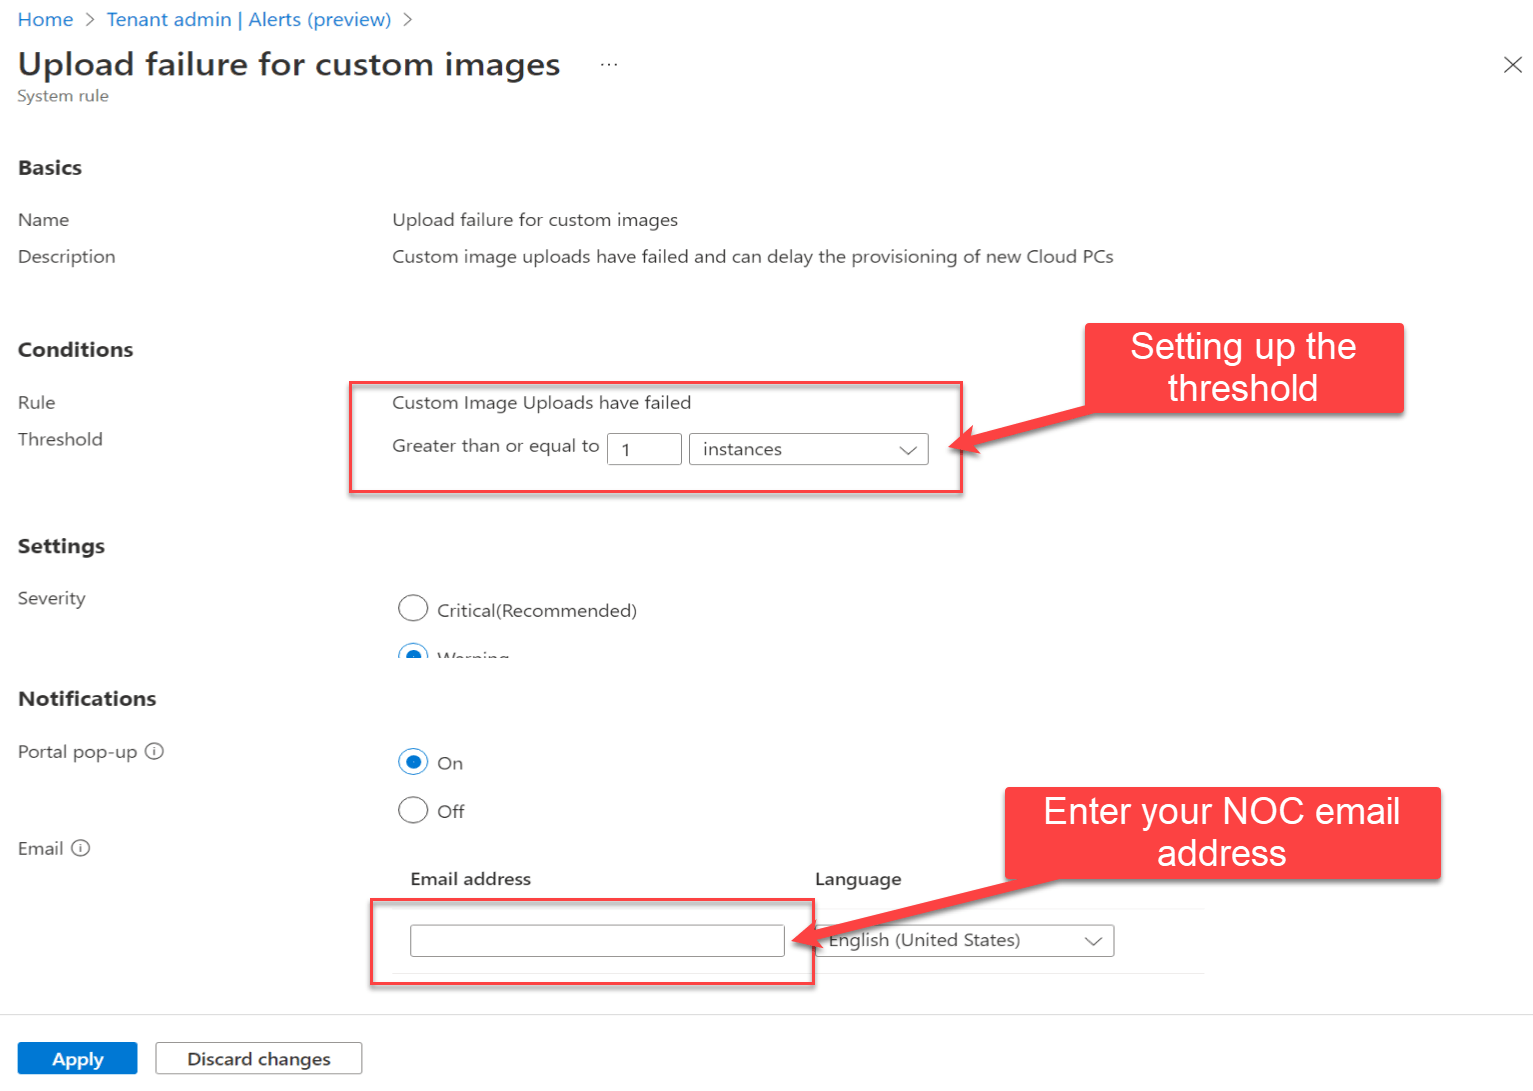
Upload failure for custom images – Custom image uploads have failed and can delay the provisioning of new Cloud PCs. This alert is typically used when leveraging the custom Azure gallery image or custom image for your Cloud PC. Knowing if there are issues with the image upload will help to understand why Cloud PC is not being created.
Upload failure for custom images
Provisioning failure impacting Cloud PCs – Provisioning has failed and is delaying end users from connecting to their Cloud PCs
Provisioning failure impacting Cloud PCs
Severity
You can tweak all three alerts based on Critical, Warning and Information. This tweaking will depend on your organizational needs and SLA requirements around each technology aspect available/failed.
Alerts – Triggered/Acknowledgement
Once the above configured alerts are triggered, they get listed under Alerts and the NOC teams monitoring the systems will have to acknowledge the alert and once resolved they need to select Resolved and close the alert.
Triggered – Alerts
I hope you will find this helpful information for setting up alerts for Windows 365 Cloud PC within your environment. Please let me know if I have missed any steps or details, and I will be happy to update the post.
Microsoft Quick Assist is a tool widely used by service desk teams to take remote control of a computer and help end-users with a screen share. We noticed with the recent changes Microsoft made to Quick Assist, it stopped working when VMware App Volumes – Writable Volumes were present.
Error launching Quick Assist
We tried many steps of installing the Quick Assist offline using various Powershell commands, and nothing worked out. We also got to a point Quick Assist will launch without the Writable Volumes present or local admins with Writable Volumes. In the end, VMware Support GSS, with help from backend engineering, provided a working solution.
Solution (Workaround)
Step 1 – Download the offline version of the Quick Assist App from the Microsoft store and place all the files into C:\Temp\QuickAssist. Following are the steps to download the offline version of MS store apps.
Offline Files MS Quick Assist
Step 2 – Delete the old version of the Quick Assist App (Not part of the MS Store). Start Menu > Settings > Apps > Optional features > Microsoft Quick Assist > Uninstall.
Uninstall Optional Features – Microsoft Quick Assist
Step 3 – Install the Offline version of the Microsoft Quick Assist package using PowerShell
Step 4 – Install WebView2 component which is a pre-requisite for Quick Assist. Note this step is quite important and not something that has been emphazied alot.
Step 5 – Launch the Quick Assist App once. Make sure, without launching the app, don’t move to the next step. Please wait at least 10 mins on this step or/else reboot the template VM and launch the app
explorer shell:AppsFolder\MicrosoftCorporationII.QuickAssist_8wekyb3d8bbwe!app
Launching Quick Assist
Step 6 – Create an OS scheduled task to run at every logon. This will launch the Quick Assist and register at every logon.
Schedule Task – Register of Microsoft Quick Assist at User Login
Step 7 – Take a snapshot of the golden image and the remaning steps will be performed in App Volumes files.
Step 8 – We need to prepare the template bundle of Writable Volumes (UIA+Profile) to contain a file startup_postsvc.bat with the following contents. Note Alter the file path if you decide to use something else.
  @echo off
  setlocal enabledelayedexpansion
  set WV_Path=none
  for /F "tokens=3" %%A in ('reg query HKLM\System\ControlSet001\Services\svservice\Parameters /v WritableVolume 2^>nul') do (
    set WV_Path=C:%%A
    fltmc attach bindflt !WV_PATH!
  )
  reg query "HKLM\SOFTWARE\WOW6432Node\Microsoft\Windows\CurrentVersion\Uninstall\Microsoft EdgeWebView" /v DisplayName >nul 2>&1
  if %ERRORLEVEL% NEQ 0 (
    reg add HKLM\SOFTWARE\Policies\Microsoft\EdgeUpdate /v InstallDefault /t REG_DWORD /d 1 /f
    start /wait C:\Temp\QuickAssist\MicrosoftEdgeWebView2RuntimeInstallerX64.exe
    reg add HKLM\SOFTWARE\Policies\Microsoft\EdgeUpdate /v InstallDefault /t REG_DWORD /d 0 /f
  )
Here is the procedure to update the writable volume’s file – Update Writable Volumes (vmware.com). Zip all the files and push the changes using AV Manager > Writables > Update Writable Volumes
Additional Files for writable volumes startup
Step 9 – Validation login to the virtual desktop (Make sure the updated file – startup_postsvc.bat are pushed onto the WV). After a few seconds, the Microsoft Edge WebView2 Runtime component and Quick Assist should appear in Programs and Features.
PowerShell Get-AppxPackage *assist*
Step 10 – Launch Quick Assist via Start Menu or Explorer and Voila!
explorer shell:AppsFolder\MicrosoftCorporationII.QuickAssist_8wekyb3d8bbwe!app
If you encounter a similar issue, you can follow the above solution. I hope you will find this information useful if you encounter the same issue. A big thanks to my teammate Jishan T for his continuous effort while troubleshooting with GSS over 3+ months.
In this blog post, we shall take a deeper look into the Azure VMware Solution network connectivity between the Azure VNet for accessing Azure native services such as Bastion, Azure AD, SQL etc. and further connectivity to the On-premise network to migrate virtual machines or hyrbid setup.
AVS Networking – Image courtesy @Microsoft
Step 1 & 2 – Connectivity between Azure VMware Solution (AVS) – Express Route to Azure VNet
After the deploying the AVS we need to connect it to the Azure VNet for consuming Azure Native Services such as Bastion, SQL, AAD etc.
Note AVS pre-deploys the ExpressRoute for you (AVS – Manage – Connectivity – Express Route).
We need to have a Virtual Network Gateway (VNG) existing on Azure VNet, or we need to create one. All steps to be performed under portal.azure.com
Deploy the Virtual Network Gateway (VNG) on Azure subscription
Make sure you have a VNG created on Azure VNET
Give it a name – AZ104-VNG01
Resource Group – Select New or existing
Location – Australia East
SKU – Standard (for demo and testing purposes)
Virtual Network – Select the existing VNET (E.g. 10.0.0.0/16) for Azure. Note it will create the Gateway Subnet automatically (10.x.x.x/24)
Type – ExpressRoute
Public IP Address – Create New (It will auto assign a public IP)
Optional Create Tags
Save and Create
Under AVS – Connectivity – Express Route
Request the Authorization key
Name – ToAzureVNET
Copy the Key and Express Route ID
Open the VNG (AZ104-VNG01) and Settings – Connections
Click on Add
Name – FromAVSPrivateCloud
Connection Type – Express Route
Enter the Authorization Key and Express Route ID and paste them here
Click OK
The Status will change from Updating to Succeeded
Now we have the connectivity between the AVS and Azure VNet.
Step 1 & 3 – Connectivity between Azure VMware Solution – ExpressRoute Global Reach to On-premise networks
Now we will establish the connectivity between AVS and On-premise networks
ExpressRoute Circuits – This is the coming from On-premise into Azure VNet
This will depend upon the partner network (Equinix, Telstra etc.)
I hope you will find this helpful information on your AVS Networking journey. Please let me know if I have missed any steps or good reference links, and I will be happy to update the post.
Automatically Power ON the Session host Virtual Machines
Monitoring Azure Virtual Desktop
Mindmap for Managing Azure Virtual Desktop (AVD)
I have managed to document all the high-level steps involved in managing the AVD on an ongoing basis. The idea here is that the mindmap acts as an excellent visual representation of what to do during ongoing maintenance activities. You can figure out in advance the requirements/steps and pre-requisites.
Managing Azure Virtual Desktop
Disclaimer – This guide is a get you started guide, and the production management may vary. Please make sure you always reference Microsoft documentation. Here is the PDF version if you would like to download and zoom in (Don’t stress your eyes!) –
I hope you will find this helpful information on your Managing Azure Virtual Desktop journey. Please let me know if I have missed any steps in the mindmap, and I will be happy to update the post.
Mind map for Azure Virtual Desktop – Getting started
Getting started with Azure Virtual Desktop (AVD)
Deployment – Pre-requisites for AVD
Master Images – (Windows 10 Multi-Session, Windows 10 1909 Enterprise or Windows Server 2019 DC)
Template and Shared Image Gallery
Host Pools
Application Groups
Workspaces
Windows Desktop Client
Quick Start Links
Mindmap for Azure Virtual Desktop (AVD) – Getting started
Managed to put together a mindmap on the AVD getting started from zero to a working desktop or application. The idea here is the mindmap acts as an excellent visual representation of what to do during pre-requisites, deployment and you can figure out in advance the requirements/steps and pre-requisites.
Azure Virtual Desktop
Disclaimer – This guide is a get you started guide, and the production settings and configuration might be different. Please make sure you change the settings appropriate for production workloads. Here is the PDF version if you would like to download and zoom in (Don’t stress your eyes!) –
I hope you will find this helpful information on your Azure Virtual Desktop journey. Please let me know if I have missed any steps in the mindmap, or reference links, and I will be happy to update the post.
It was patch Tuesday time, and we were implementing the Windows 10 1909 Oct October 12, 2021—KB5006667 (OS Build 18363.1854) patch to our base images which are used for VMware Horizon VDI. During our validations, we started noticing the strange behaviour of Explorer.exe crashing and desktop becoming completely unusable.
The Windows explorer.exe keeps crashing within the virtual desktop of Windows 10 1909. The virtual desktop is entirely unusable. The only way to see the Event Viewer or anything is by using Horizon Client – Options – Send Ctrl + Alt + Del command within the virtual desktop and then opening up the Task Manager.
Cause
Provided by Microsoft – The explorer is trying to update feeds content, and there is a NULL value due to this bug that is causing explorer to crash.
Resolution
We tried performing various steps of un-install and re-installing the patch etc.. However, nothing worked, and we ended up working with Microsoft and seemed like it was a known issue, and they provided us with the following fix:
I have been trying out the Azure VMware Solution (AVS) on the VMware HOL and going through the techzone documentation. In this post, we shall take a look into these topics:
Mindmap – Steps for AVS Deployment and Networking
Quick Start Links
Optional – Deploy AVS via Azure Resource Manager Templates
Mindmap for AVS Deployment/Networking
Managed to put together a mindmap on the AVS deployment and networking steps of the service. The idea here is the mindmap acts like an excellent visual representation of what to do during deployment and you can figure out in advance the requirements/steps and pre-requisites.
Azure VMware Solution
Here is the PDF version if you would like to download and zoom-in
Optional – Deploying AVS using Azure Resource Manager
We can also deploy the AVS solution via PowerShell and using the Azure Resource Manager (ARM) template. The advantage here is you have slightly more advanced options that are not available via the GUI. (E.g. You can set the desired password for vCenter and NSX)
I hope you will find this helpful information on your AVS journey. Please let me know if I have missed any steps in the mindmap or reference links and I will be happy to update the post.



Recent Comments