Archive | Microsoft Intune RSS feed for this section

Windows 365 Cloud PC for Developers – Developer Configuration Image + PowerShell Provisioning

2 Sep

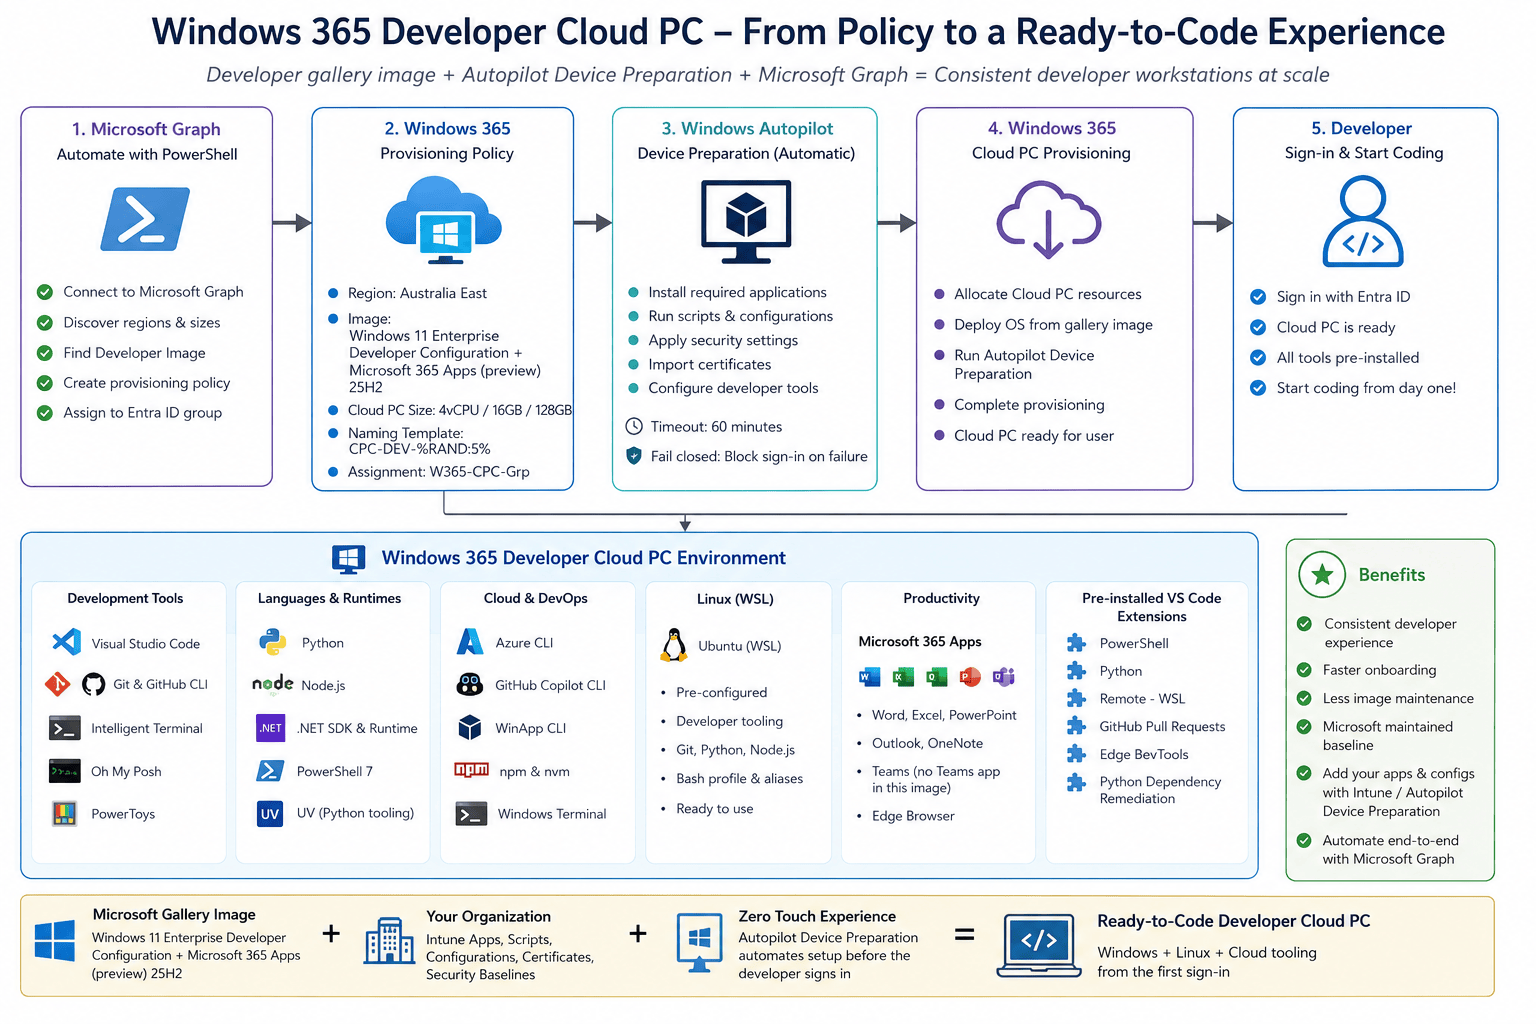
At Microsoft Build 2026, Microsoft announced a new developer-focused experience for Windows 365 a Windows 11 Developer Configuration gallery image designed to give developers a Cloud PC that is much closer to ready to code from the first sign-in.

Instead of provisioning a clean Windows Cloud PC and then spending considerable time installing VS Code, Git, Python, Node.js, WSL, command-line tooling and all the other pieces normally required for a developer workstation, Microsoft now provides a preconfigured Windows 365 gallery image with many of these components already installed.

The Developer Configuration image is currently Public Preview and is available for Windows 365 Enterprise and Windows 365 Flex Dedicated mode. Microsoft explicitly states that the image isn’t intended for production workloads while it remains in preview.

Naturally, instead of only creating the provisioning policy through the Intune portal, I wanted to see what the experience looked like through Microsoft Graph and PowerShell.

In this post I’ll cover:

  • What the Windows 365 Developer Configuration image actually is
  • A few important things to understand
  • Developer Image VS Custom Image
  • Creating the Windows 365 provisioning policy with PowerShell
  • Provisioning the Developer Cloud PC
  • Looking inside the Cloud PC to see what Microsoft preinstalled

What is the Windows 365 Developer Configuration image?

The idea is fairly simple.

A traditional Windows 365 gallery image gives you either:

  • Windows Enterprise
  • Windows Enterprise + Microsoft 365 Apps

The new developer image adds another starting point:

Windows Enterprise + Microsoft 365 Apps + a preconfigured developer environment.

Microsoft announced the image at Build 2026 as part of its broader Windows 365 investment for developer workloads. The goal is to reduce the repetitive workstation preparation that normally occurs when onboarding a developer, rebuilding their machine, or moving them onto a new project.

The important distinction here is that this isn’t a custom image that I built and uploaded. It is a Microsoft-maintained Windows 365 gallery image. That means the provisioning experience is exactly the same basic Windows 365 model we already know, but the starting operating system contains a substantially larger developer toolchain.

My mental model: Think of it as Microsoft’s Windows 365 equivalent of a developer workstation baseline – Windows, Microsoft 365 Apps, WSL and the commonly used development tooling already baked into the gallery image.

A few important things to understand

There are several caveats worth highlighting before anyone starts replacing their developer workstation strategy with this image.

1. The Developer Configuration image is still Public Preview

Microsoft explicitly states that the Developer Configuration gallery image isn’t currently intended for production workloads.

So for now I would treat this as something to evaluate, validate and design around rather than immediately rolling it out to every production developer.

2. Microsoft doesn’t manage all those third-party applications for you

Although Microsoft supplies the developer tools in the image, the customer remains responsible for managing and maintaining third-party applications, including vulnerability management, security updates and compliance.

A preinstalled application does not automatically mean a fully managed application.

3. Preinstalled third-party applications aren’t currently packaged Intune apps

Microsoft specifically notes that the third-party tools baked into the image aren’t currently manageable through Intune as packaged applications.

If your organisation requires full Intune application lifecycle management, Microsoft recommends removing the preinstalled versions and redeploying those applications through Intune.

That is something I would definitely evaluate before enterprise adoption.

4. Gallery images move forward

Microsoft refreshes supported Windows 365 gallery images monthly.

That is great from a security and freshness point of view, but it also means:

Test the image, don’t assume it is immutable.

If a development team depends on very specific Python, Node, SDK or extension versions, proper version management is still required.

Developer image vs custom image

I don’t think the new Developer Configuration image means custom Windows 365 images suddenly disappear.

RequirementDeveloper gallery imageCustom image
Standard developer toolsExcellentYou maintain them
Fast starting pointExcellentDepends on image pipeline
Microsoft-maintained Windows baselineYesNo
Internal applicationsAdd via Intune / Device PrepBake into image if required
Very specific tool versionsAdditional management requiredFull control
Highly specialised development stackLimitedExcellent
Image engineering overheadLowHigher
Developer onboarding consistencyStrongStrong if well managed

For many organisations, I suspect the sweet spot will be:

Microsoft Developer Gallery Image + Intune + Autopilot Device Preparation

rather than building an enormous custom developer image from scratch.

Creating the provisioning policy with PowerShell

Now we have everything we need:

  • Developer gallery image
  • Region
  • Cloud PC SKU
  • Entra ID assignment group
  • Windows language/locale
  • Device naming convention

I created the provisioning policy using Microsoft Graph.

My policy is called:

W365-Developer-SKU-Image

and my device naming template is:

CPC-DEV-%RAND:5%

The important image configuration is:

Image Type : gallery
Image ID :
microsoftwindowsdesktop_windows-ent-cpc_win11-25h2-ent-cpc-devready

I’ll provide the complete PowerShell script below so you can modify the variables for your own environment.

PowerShell Script

Link GitHub – avdwin365mem/CloudPC-Prov-DevImage.ps1 at main · askaresh/avdwin365mem

cloudpc-prov-devimage.ps1
#############################################################################################
# Windows 365 Dedicated Cloud PC Provisioning Policy via PowerShell
# Entra Join + Single Sign-On + Automatic (Recommended) Region + Dev Box Gallery Image
# Comment or Un-comment the components that do not apply to your environment
#
# Only requires the Microsoft.Graph.Authentication module - all work is done with raw
# Graph calls so the heavier SDK sub-modules are never loaded.
#############################################################################################
$ErrorActionPreference = "Stop"
#---------------------------------------------------------------------------------------------
# STEP 0 - Module + Authentication
#---------------------------------------------------------------------------------------------
# Install once if needed:
# Install-Module Microsoft.Graph.Authentication -Scope CurrentUser -Force
Import-Module Microsoft.Graph.Authentication
# Set your tenant explicitly - avoids home-tenant guessing and some consent failures
$TenantId = "dXXXX146-4eXX-4XX4-8XXX-fe79XXXXX5"
Connect-MgGraph -TenantId $TenantId -Scopes "CloudPC.ReadWrite.All","Group.Read.All"
# If Connect-MgGraph throws AADSTS650051, see the troubleshooting block at the bottom.
# Hard stop if we are not actually connected - prevents the rest of the script running blind
$ctx = Get-MgContext
if (-not $ctx) { throw "Not connected to Microsoft Graph. Resolve the sign-in error before continuing." }
Write-Host "Connected as $($ctx.Account) to tenant $($ctx.TenantId)" -ForegroundColor Cyan
# Confirm you hold the Cloud PC RBAC permissions before you start
Invoke-MgGraphRequest -Method GET -OutputType PSObject `
-Uri "https://graph.microsoft.com/beta/deviceManagement/virtualEndpoint/getEffectivePermissions"
#---------------------------------------------------------------------------------------------
# STEP 1 - Discovery (optional, but confirms your inputs are valid in THIS tenant)
#---------------------------------------------------------------------------------------------
# 1a. What Cloud PC SKUs have you actually purchased?
(Invoke-MgGraphRequest -Method GET -OutputType PSObject `
-Uri "https://graph.microsoft.com/beta/deviceManagement/virtualEndpoint/retrievePurchasedServicePlans?`$select=id,displayName,type,vCpuCount,ramInGB,storageInGB,userProfileInGB,category,supportedSolution,provisioningType").value |
Format-Table displayName, vCpuCount, ramInGB, storageInGB -AutoSize
# 1b. Which regions are available? Grab exact regionName / regionGroup strings here.
(Invoke-MgGraphRequest -Method GET -OutputType PSObject `
-Uri "https://graph.microsoft.com/beta/deviceManagement/virtualEndpoint/supportedRegions?`$filter=supportedSolution%20eq%20%27windows365%27&`$select=id,displayName,regionStatus,regionGroup,geographicLocationType").value |
Format-Table id, displayName, regionGroup, regionStatus -AutoSize
# 1c. Gallery images - confirm the imageId below exists and is 'supported' in this tenant.
(Invoke-MgGraphRequest -Method GET -OutputType PSObject `
-Uri "https://graph.microsoft.com/beta/deviceManagement/virtualEndpoint/galleryImages").value |
Where-Object { $_.status -eq "supported" } |
Format-Table id, displayName, status -AutoSize
# 1d. Custom (uploaded) images - use these instead if imageType = "custom"
# (Invoke-MgGraphRequest -Method GET -OutputType PSObject `
# -Uri "https://graph.microsoft.com/beta/deviceManagement/virtualEndpoint/deviceImages").value |
# Format-Table id, displayName, status, osBuildNumber -AutoSize
# 1e. Only needed for Hybrid Entra Join. Skip entirely for Entra Join (this script).
# (Invoke-MgGraphRequest -Method GET -OutputType PSObject `
# -Uri "https://graph.microsoft.com/beta/deviceManagement/virtualEndpoint/onPremisesConnections?`$select=id,displayName,healthCheckStatus,adDomainName").value |
# Format-Table id, displayName, healthCheckStatus -AutoSize
#---------------------------------------------------------------------------------------------
# STEP 2 - Build the Provisioning Policy body
#---------------------------------------------------------------------------------------------
$params = @{
displayName = "W365-Developer-SKU-Image"
description = "A Cloud PC for the Developers"
# dedicated = 1:1 Cloud PC per user.
# Alternatives: sharedByUser | sharedByEntraGroup (Frontline)
provisioningType = "dedicated"
# cloudPc = full desktop. Alternative: privateCloudPc
userExperienceType = "cloudPc"
# windows365 = licence-based W365. Alternative: devBox
managedBy = "windows365"
#-----------------------------------------------------------------------------------------
# Image - verify this ID appeared in the Step 1c output before running.
# Swap imageType to "custom" and use a deviceImages ID for your own uploaded image.
#-----------------------------------------------------------------------------------------
imageId = "microsoftwindowsdesktop_windows-ent-cpc_win11-25h2-ent-cpc-devready"
imageDisplayName = "Windows 11 Enterprise Developer Configuration + Microsoft 365 Apps (preview) 25H2"
imageType = "gallery"
#-----------------------------------------------------------------------------------------
# Microsoft Managed Desktop / Windows 365 Enterprise management
#-----------------------------------------------------------------------------------------
microsoftManagedDesktop = @{
type = "notManaged"
profile = $null
}
#-----------------------------------------------------------------------------------------
# Single Sign-On - requires the Entra Kerberos / SSO prerequisites to be in place
#-----------------------------------------------------------------------------------------
enableSingleSignOn = $true
#-----------------------------------------------------------------------------------------
# Entra Join with AUTOMATIC region selection inside the Australia/New Zealand geography.
# To pin a region instead: regionGroup = "australia"; regionName = "australiaeast"
# and drop geographicLocationType.
#-----------------------------------------------------------------------------------------
domainJoinConfigurations = @(
@{
type = "azureADJoin"
geographicLocationType = "australiaNewZealand"
regionGroup = "automatic"
regionName = "automatic"
}
)
# Hybrid Entra Join variant - comment out the block above and use this instead:
# domainJoinConfigurations = @(
# @{
# type = "hybridAzureADJoin"
# onPremisesConnectionId = "<connection-id-from-step-1e>"
# }
# )
windowsSettings = @{
language = "en-US"
}
#-----------------------------------------------------------------------------------------
# Naming template. %RAND:x% where x is 5-11. Total name must stay <= 15 chars.
# "CPC-DEV-" (8) + 5 random = 13 chars. Safe.
#-----------------------------------------------------------------------------------------
cloudPcNamingTemplate = "CPC-DEV-%RAND:5%"
# Scope tags. "0" is the built-in Default scope - omit this line entirely to inherit it.
scopeIds = @("0")
# Windows Autopatch - $null means no Autopatch group assigned
autopatch = @{
autopatchGroupId = $null
}
# User settings persistence - only meaningful for shared/non-dedicated types.
# NOTE: the top-level userSettingsPersistenceEnabled is flagged deprecated by Graph
# (sunset advertised via response Link headers). Use the nested configuration object.
# userSettingsPersistenceEnabled = $false
userSettingsPersistenceConfiguration = @{
userSettingsPersistenceEnabled = $false
userSettingsPersistenceStorageSizeCategory = "sixteenGB"
}
# Autopilot device preparation - not used here
autopilotConfiguration = $null
}
#---------------------------------------------------------------------------------------------
# STEP 3 - Create the policy
#---------------------------------------------------------------------------------------------
$policy = Invoke-MgGraphRequest -Method POST -OutputType PSObject `
-Uri "https://graph.microsoft.com/beta/deviceManagement/virtualEndpoint/provisioningPolicies" `
-Body ($params | ConvertTo-Json -Depth 10) -ContentType "application/json"
if (-not $policy.id) { throw "Policy creation returned no ID - stopping before assignment." }
Write-Host "Created provisioning policy: $($policy.displayName) [$($policy.id)]" -ForegroundColor Green
#---------------------------------------------------------------------------------------------
# STEP 4 - Assign the policy to an Entra security group
#---------------------------------------------------------------------------------------------
# Option A - resolve by display name
$groupName = "W365-CPC-Grp"
$filterEnc = [uri]::EscapeDataString("displayName eq '$groupName'")
$group = (Invoke-MgGraphRequest -Method GET -OutputType PSObject `
-Uri "https://graph.microsoft.com/v1.0/groups?`$filter=$filterEnc&`$select=id,displayName,securityEnabled,groupTypes").value |
Select-Object -First 1
# Option B - hard-code the object ID instead:
# $group = Invoke-MgGraphRequest -Method GET -OutputType PSObject `
# -Uri "https://graph.microsoft.com/v1.0/groups/01eecc64-c3bb-4c47-85ce-bafb18feef12?`$select=id,displayName,securityEnabled,groupTypes"
if (-not $group) { throw "Group '$groupName' not found in tenant $($ctx.TenantId)." }
if (-not $group.securityEnabled) { throw "Group '$($group.displayName)' is not security-enabled - assignment will fail." }
Write-Host "Assignment target: $($group.displayName) [$($group.id)]" -ForegroundColor Cyan
$assign = @{
assignments = @(
@{
id = ""
target = @{
"@odata.type" = "#microsoft.graph.cloudPcManagementGroupAssignmentTarget"
groupId = $group.id
}
}
)
}
Invoke-MgGraphRequest -Method POST `
-Uri "https://graph.microsoft.com/beta/deviceManagement/virtualEndpoint/provisioningPolicies/$($policy.id)/assign" `
-Body ($assign | ConvertTo-Json -Depth 10) -ContentType "application/json"
Write-Host "Assigned policy to $($group.displayName)" -ForegroundColor Green
#---------------------------------------------------------------------------------------------
# STEP 5 - Verify
#---------------------------------------------------------------------------------------------
Invoke-MgGraphRequest -Method GET -OutputType PSObject `
-Uri "https://graph.microsoft.com/beta/deviceManagement/virtualEndpoint/provisioningPolicies/$($policy.id)?`$expand=assignments&`$select=id,displayName,description,imageId,imageDisplayName,imageType,enableSingleSignOn,cloudPcNamingTemplate,provisioningType,managedBy,scopeIds,autopilotConfiguration,domainJoinConfigurations,microsoftManagedDesktop,autopatch,windowsSettings,lastModifiedDateTime,createdBy,createdDateTime,lastModifiedBy,assignments,userExperienceType,userSettingsPersistenceEnabled,userSettingsPersistenceConfiguration" |
ConvertTo-Json -Depth 10
# Disconnect-MgGraph

One important point for anyone using the Graph examples in this post: Microsoft Graph has both v1.0 and beta capabilities around Windows 365 provisioning policies. Some newer provisioning-policy properties, including autopilotConfiguration, are documented through the beta resource. Microsoft explicitly notes that beta APIs can change and shouldn’t be treated as production-stable APIs.

Provisioning policy created

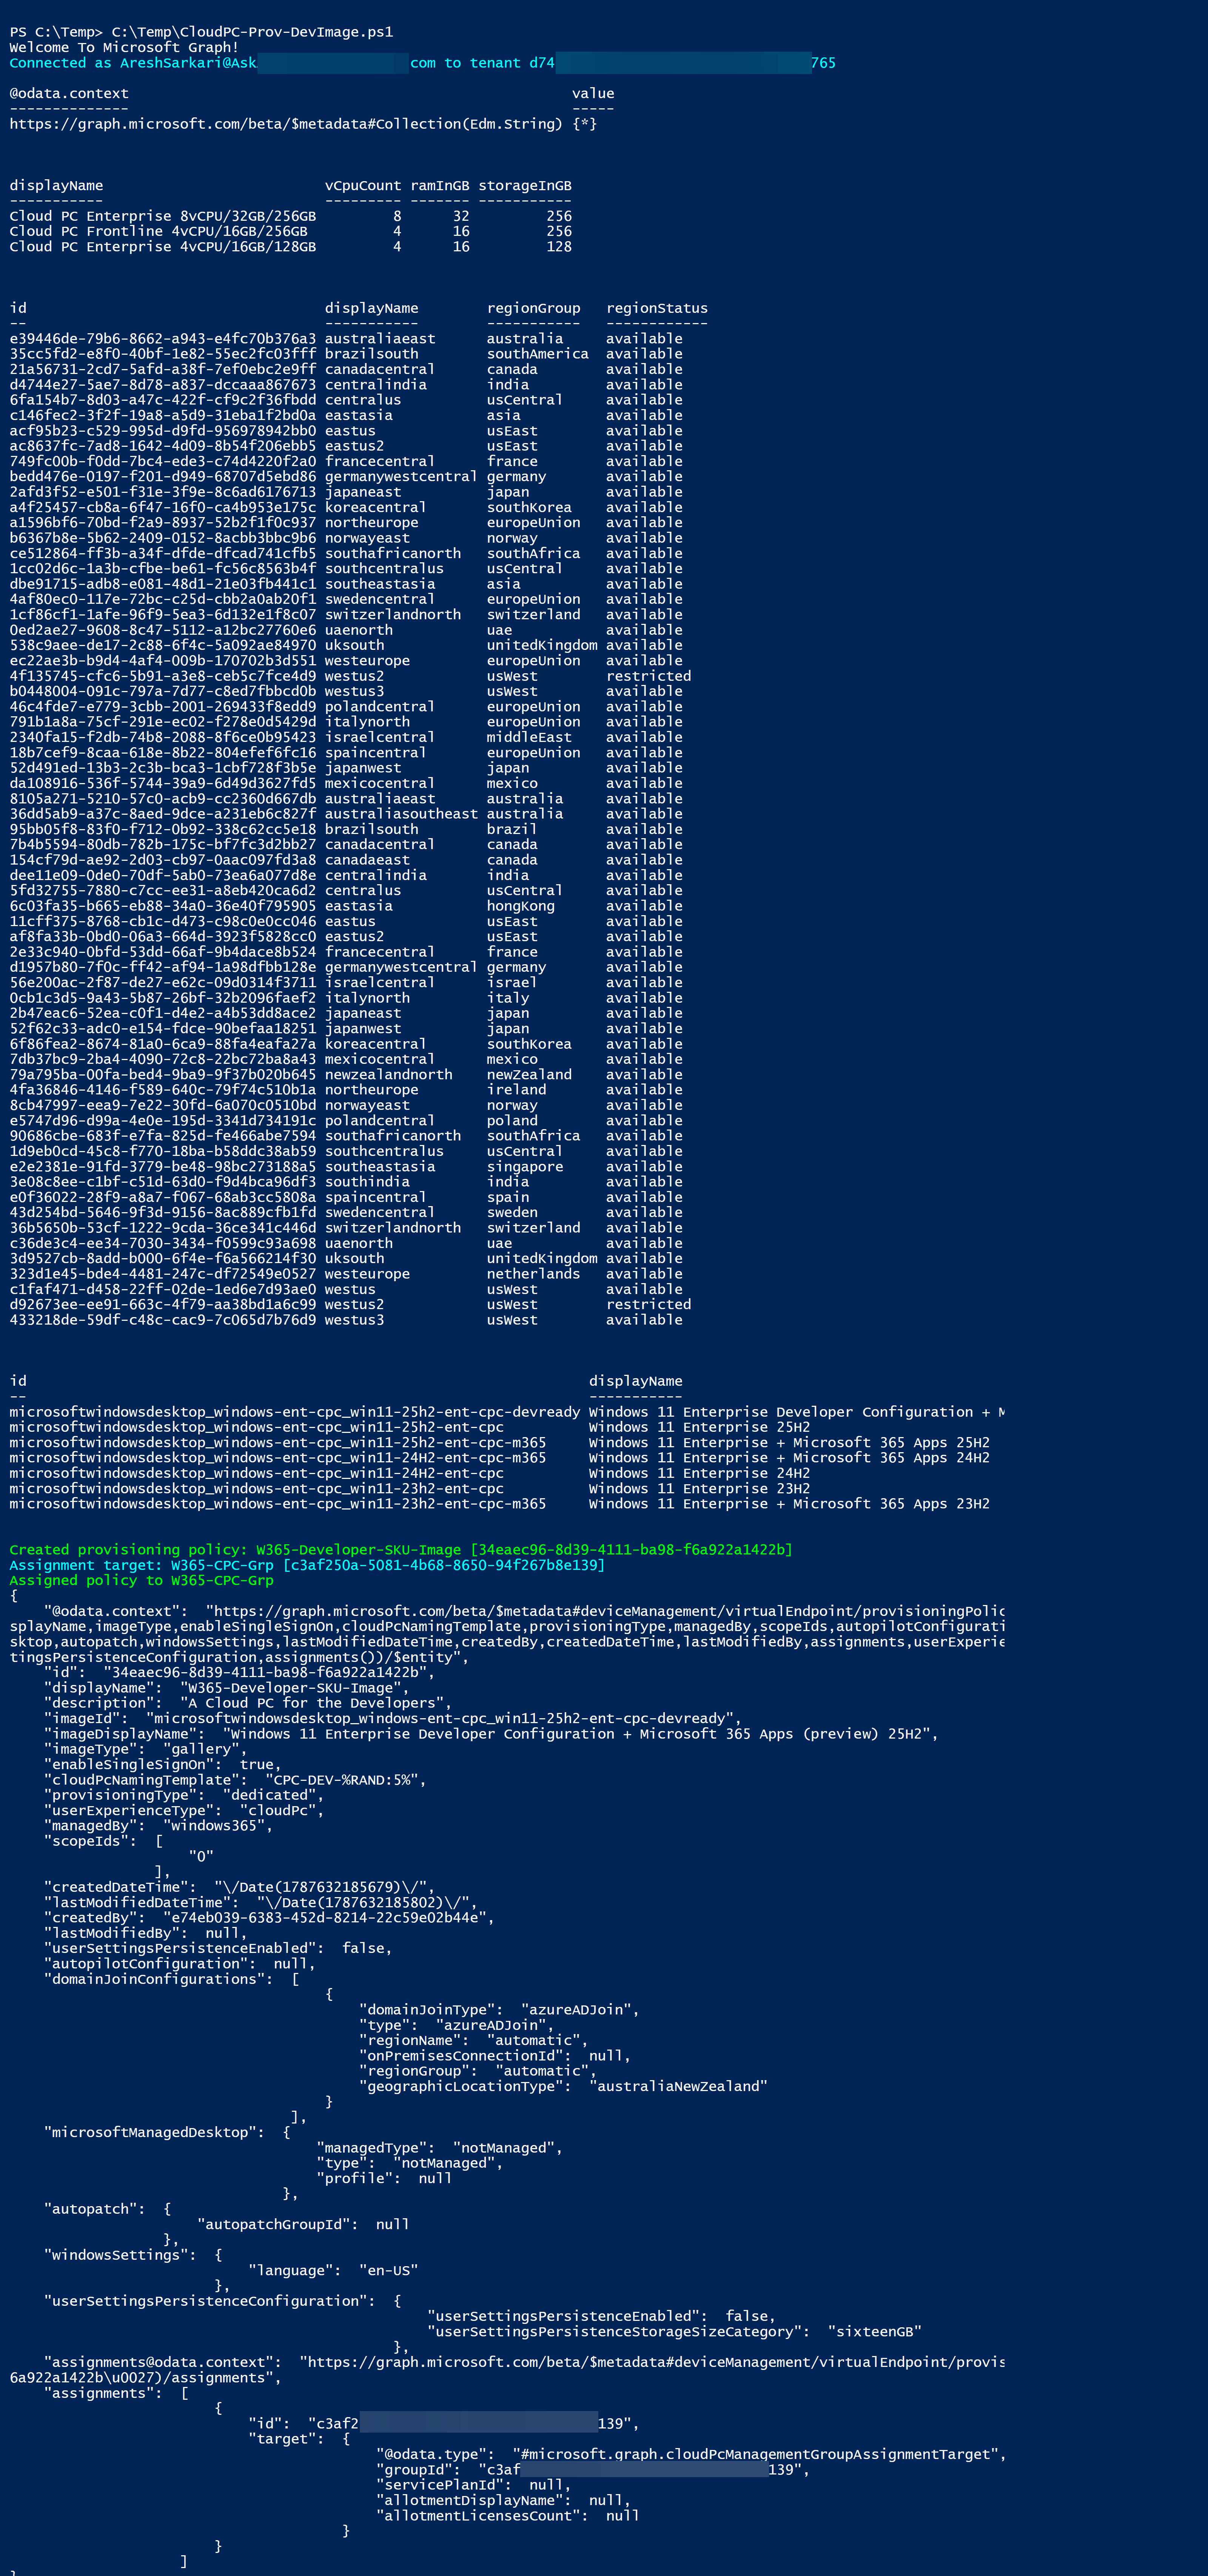
Here is the output from my script after creating the policy:

Created provisioning policy:
W365-Developer-SKU-Image
Assignment target:
W365-CPC-Grp
Assigned policy to:
W365-CPC-Grp

And Graph confirms the image:

"imageType": "gallery",
"imageId": "microsoftwindowsdesktop_windows-ent-cpc_win11-25h2-ent-cpc-devready",
"imageDisplayName": "Windows 11 Enterprise Developer Configuration + Microsoft 365 Apps (preview) 25H2"

along with:

"cloudPcNamingTemplate": "CPC-DEV-%RAND:5%",
"provisioningType": "dedicated",
"managedBy": "windows365"

For validation I also read the provisioning policy back from Graph with the assignments expanded.

This is something I normally include in automation rather than simply assuming a successful HTTP POST means the complete configuration ended up exactly as expected.

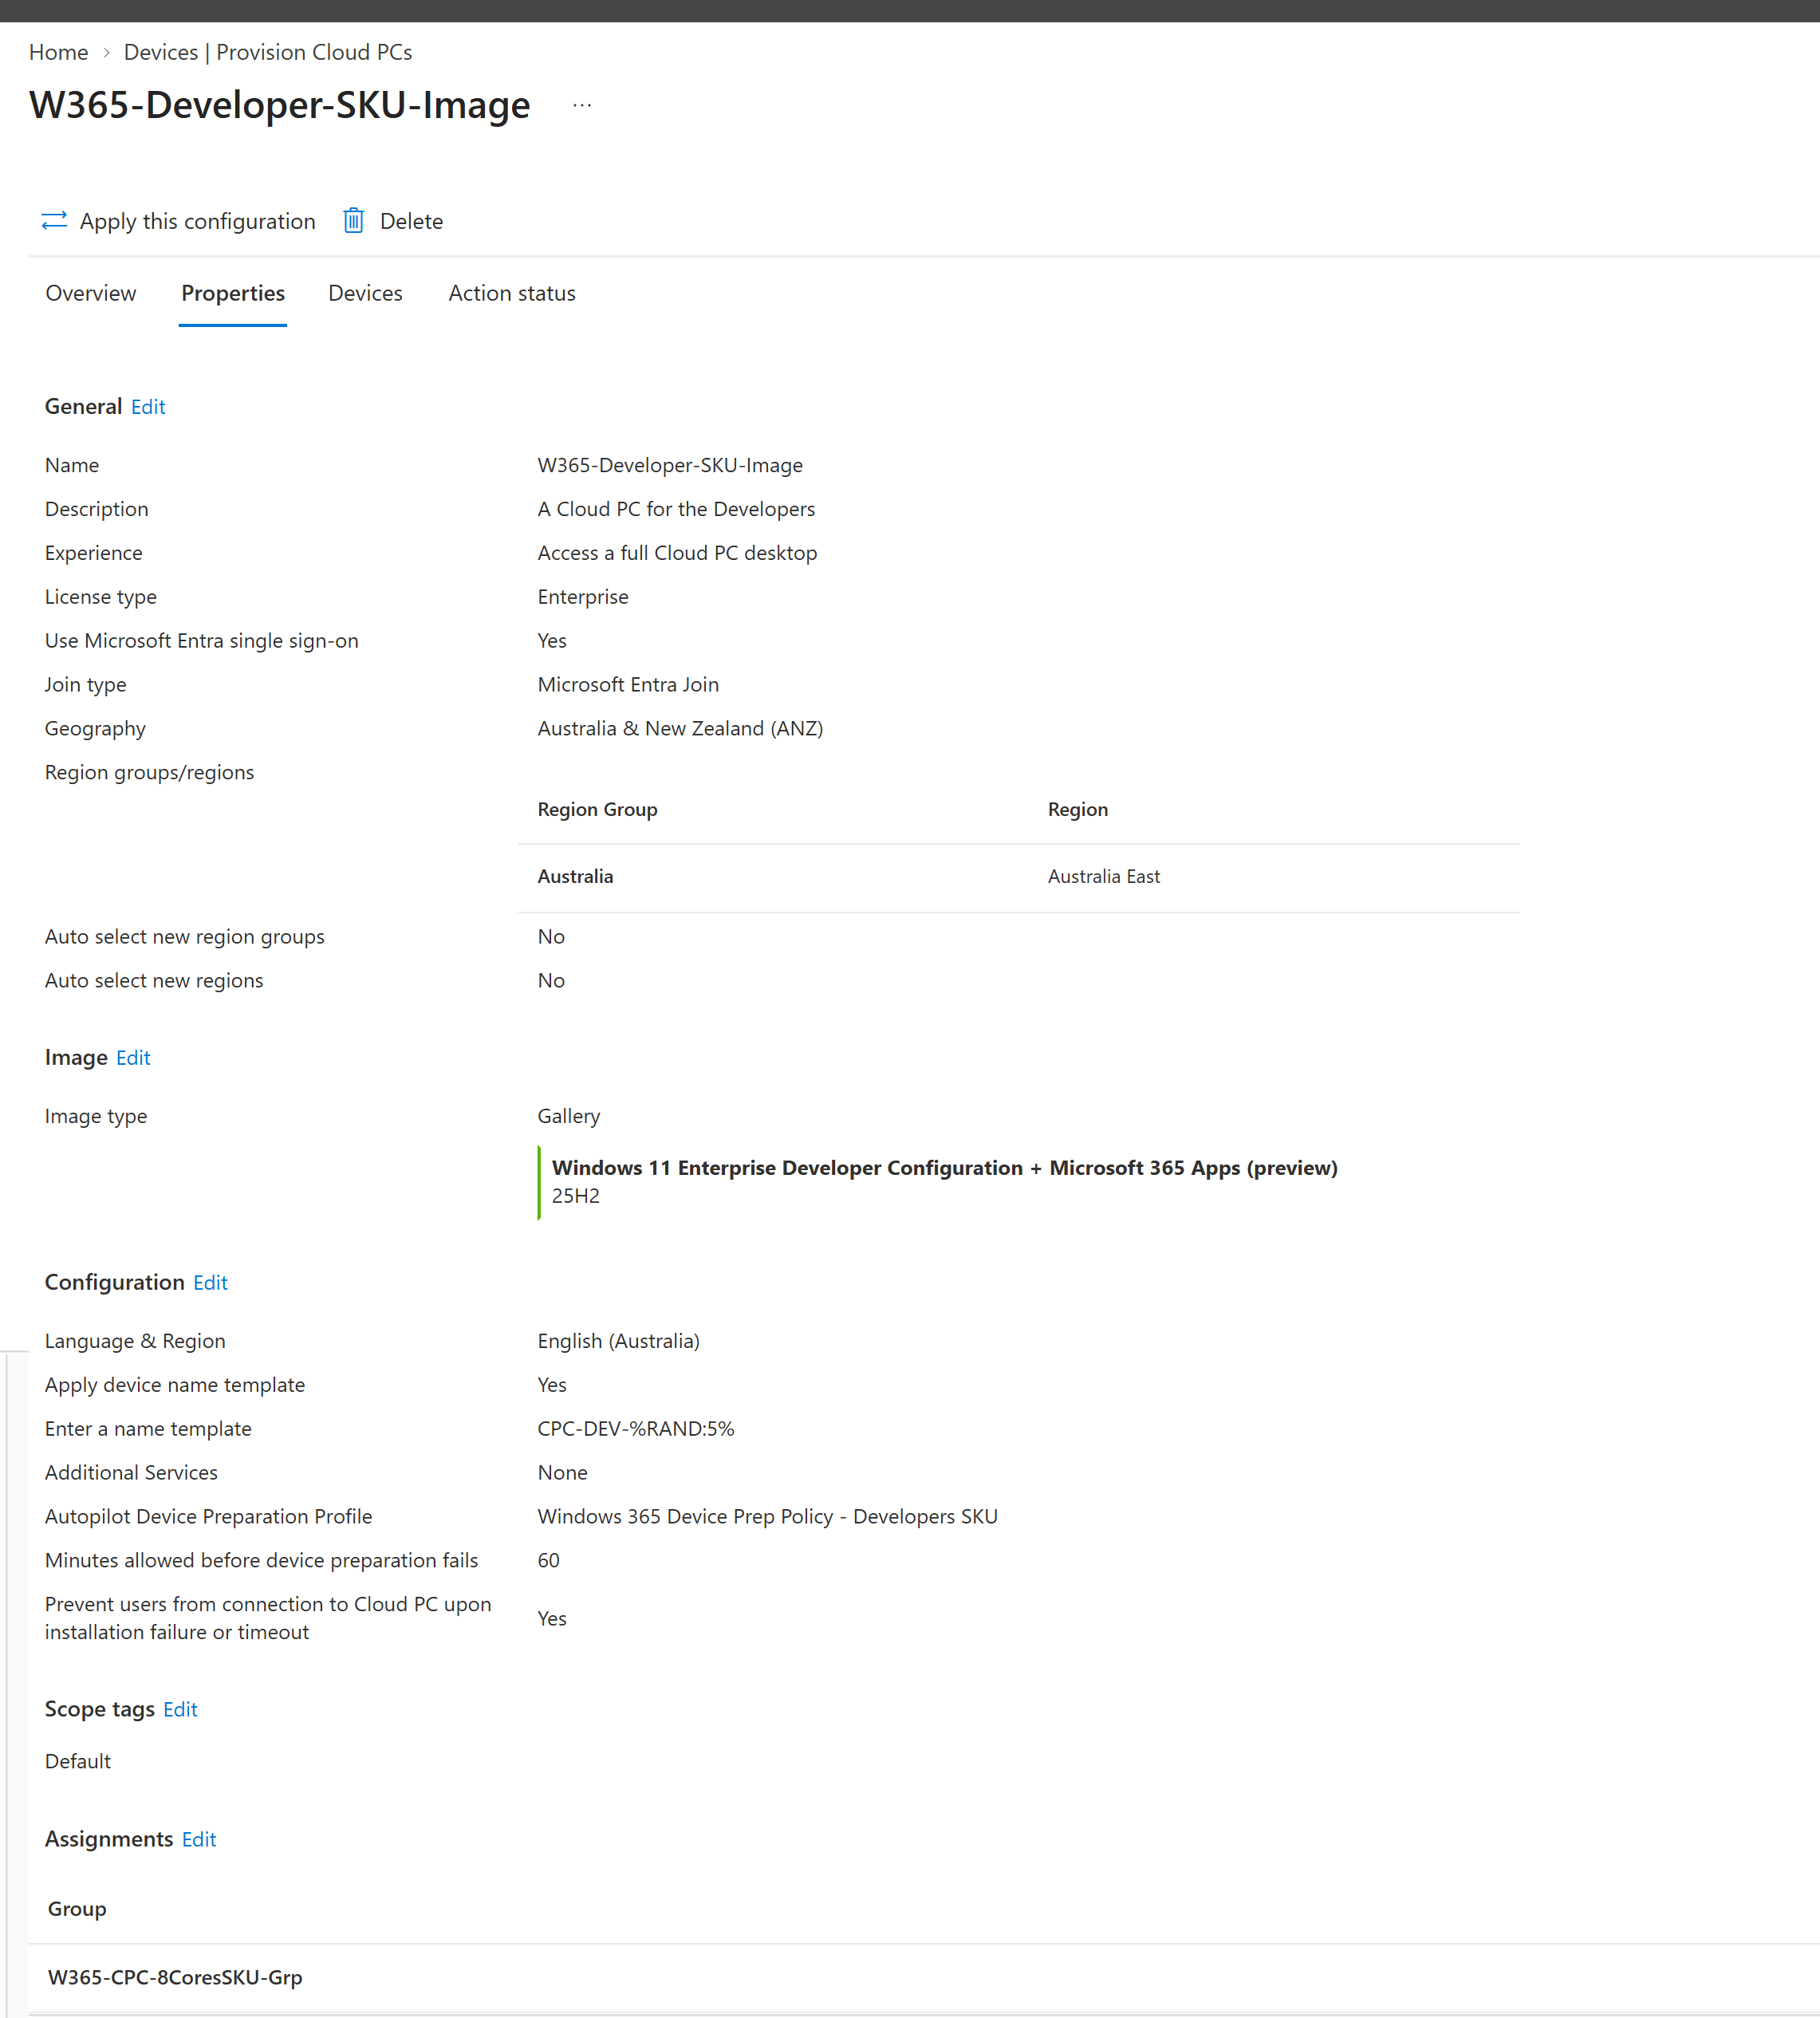
Confirming the developer image in Intune

Back in Microsoft Intune:

Devices → Windows 365 → Provisioning policies

I can now see my two test provisioning policies using:

Windows 11 Enterprise Developer Configuration +
Microsoft 365 Apps (preview) 25H2

and Windows 365 reports the image as:

Supported

At this point we’ve created a completely standard Windows 365 provisioning policy — but with Microsoft’s new developer-ready image as the operating-system baseline.

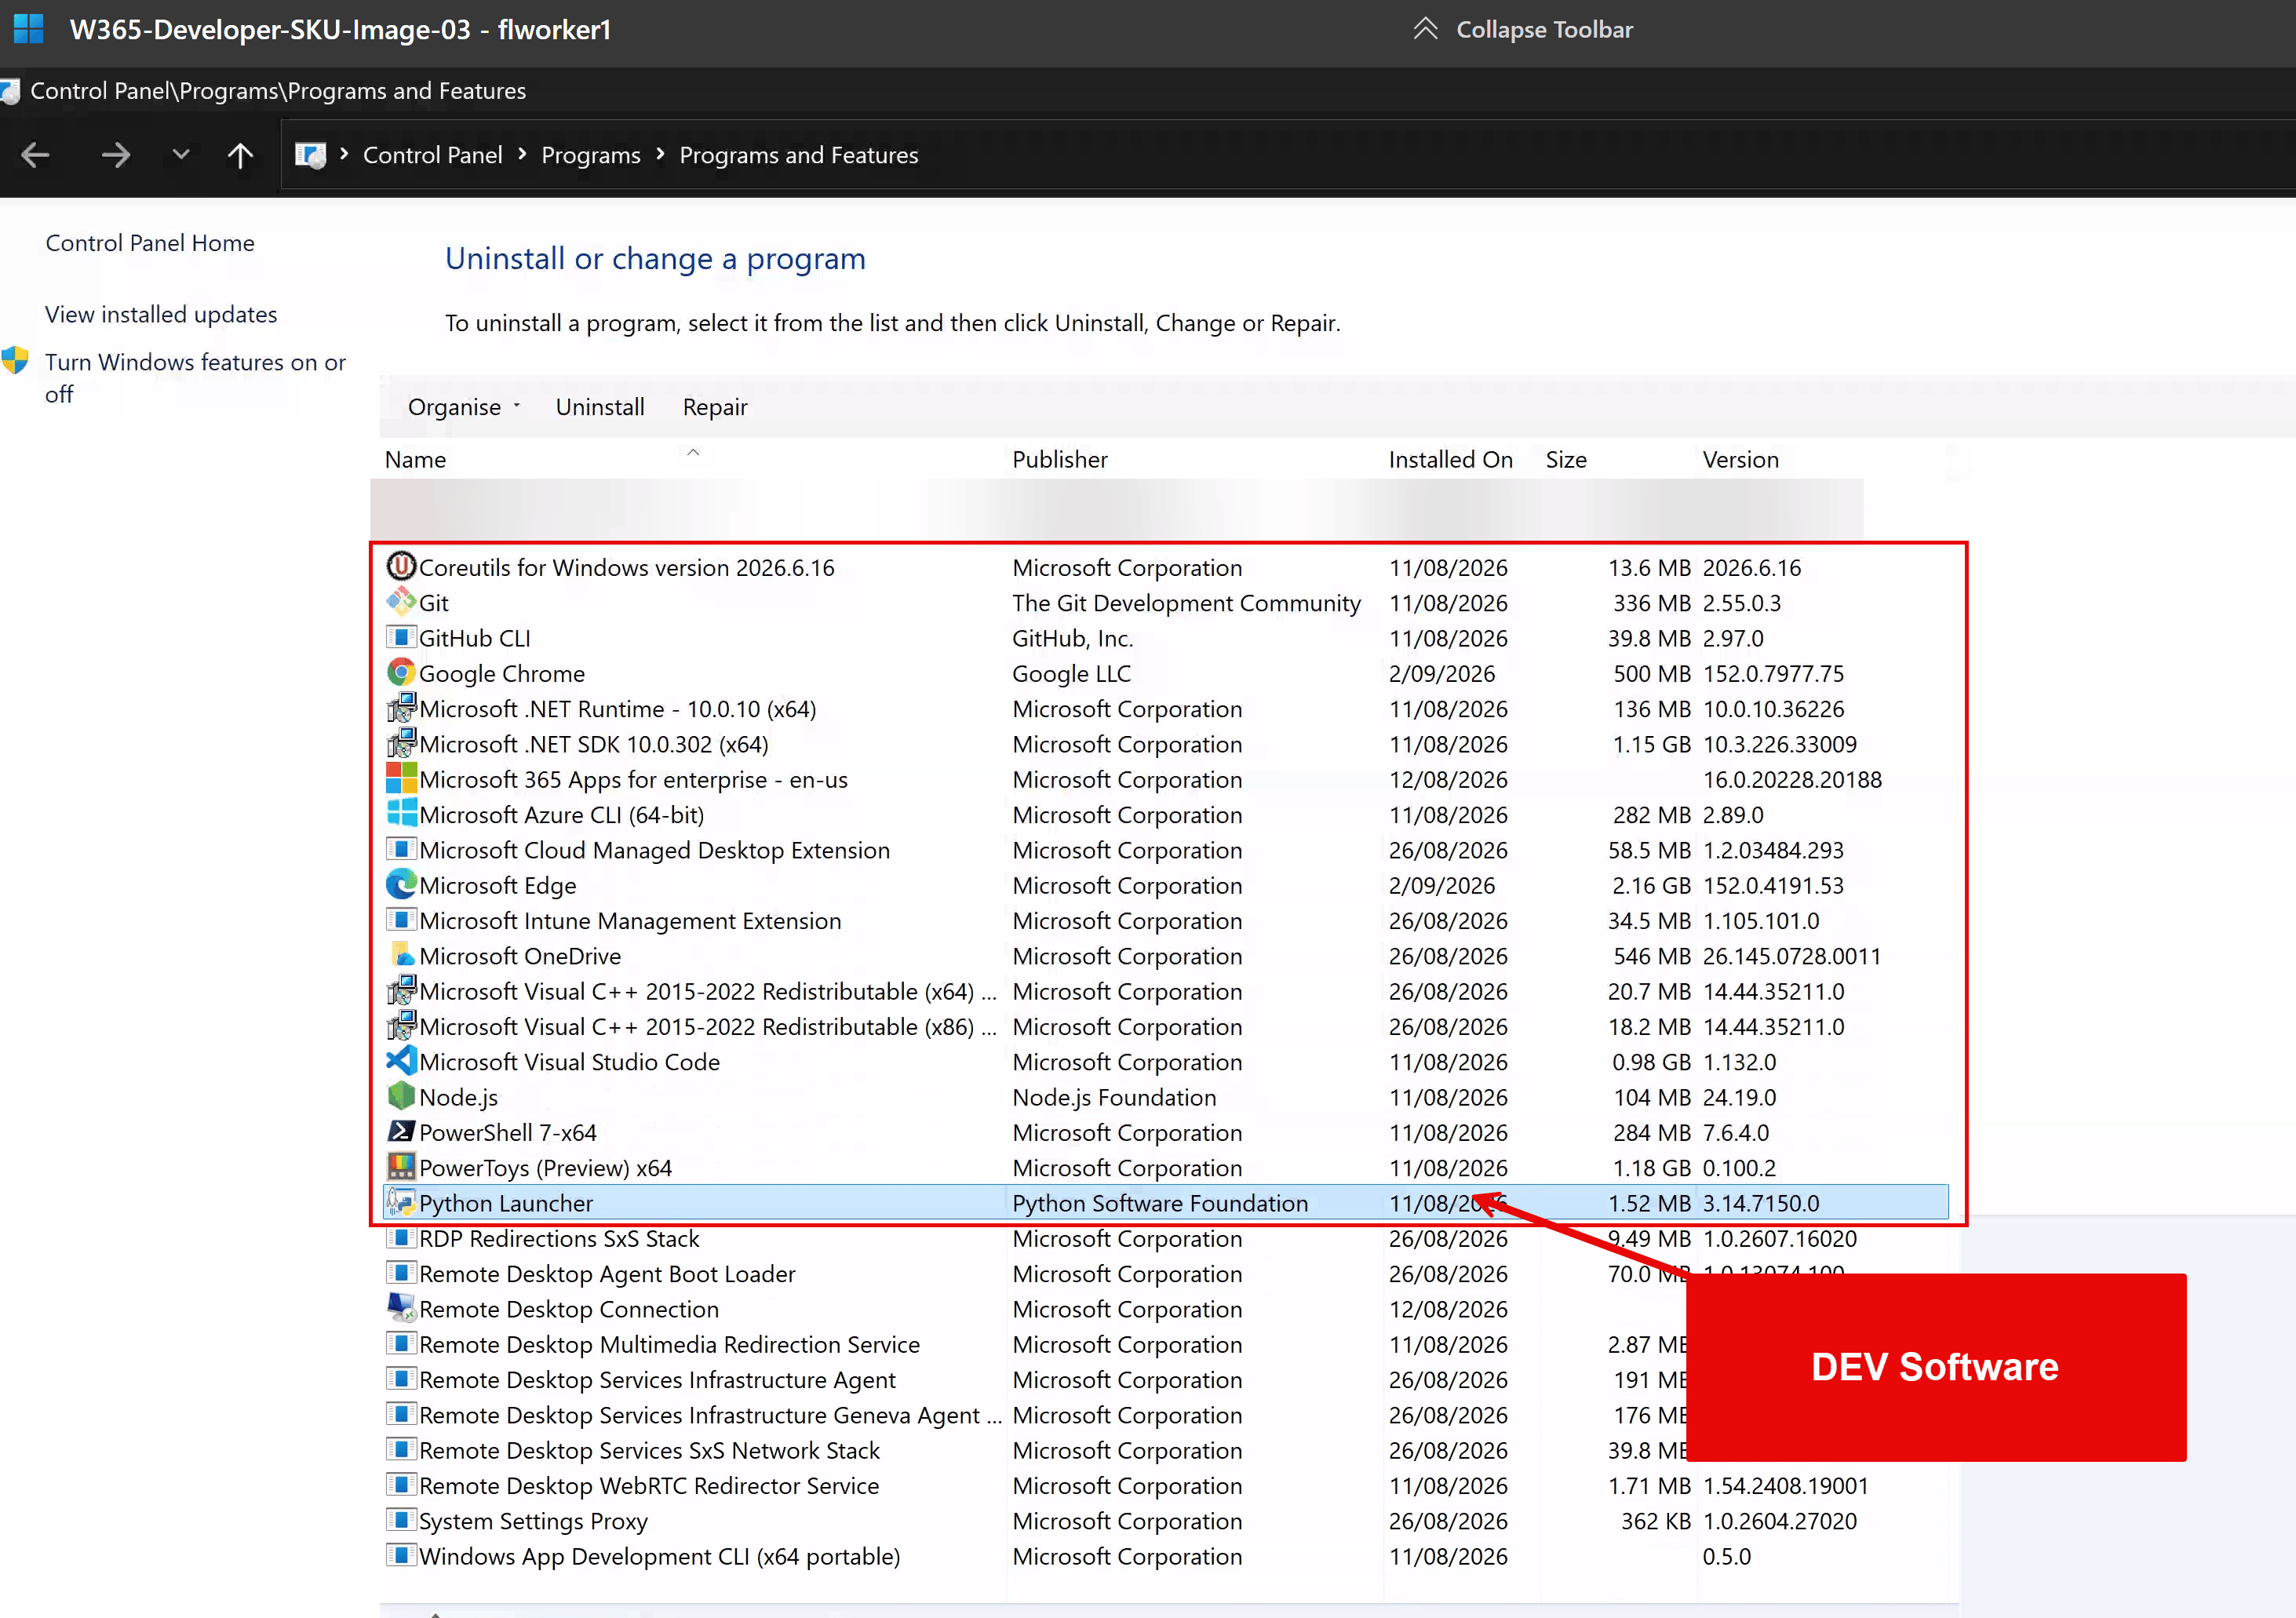
So what’s actually installed inside the Developer Cloud PC?

This was the part I really wanted to inspect. According to Microsoft’s current Developer Configuration image documentation, the image contains significantly more than just VS Code and Git.

The Windows environment currently includes tooling such as:

AreaIncluded tooling
EditorVisual Studio Code
Source controlGit, GitHub tooling
LanguagesPython, Node.js
Node ecosystemnpm, nvm
PowerShellPowerShell 7
LinuxWSL + Ubuntu
AzureAzure CLI
.NET.NET Runtime and .NET SDK
Python toolingUV
TerminalIntelligent Terminal
Unix toolingCoreutils
PromptOh My Posh
Windows developmentWinApp CLI
UtilitiesPowerToys
AI developmentGitHub Copilot CLI

Microsoft also preinstalls several VS Code extensions, including PowerShell, Python, WSL, GitHub pull-request tooling and Edge developer tooling.

Microsoft updated the developer image again in August 2026 to add Intelligent Terminal and Coreutils, which is worth calling out because it demonstrates that this isn’t a one-time static developer image — the gallery image itself continues evolving.

Windows + Linux in the same developer workstation

One of the important parts of this image is WSL.

Microsoft doesn’t simply enable Windows Subsystem for Linux; the image includes:

WSL
+
Ubuntu
+
developer tooling inside the WSL environment

Microsoft also includes a Bash script used to configure the user environment inside Ubuntu.

That gives the developer a much more useful starting position:

Windows 11
├── Visual Studio Code
├── PowerShell 7
├── Git
├── Python
├── Node.js
├── Azure CLI
├── .NET
└── WSL
└── Ubuntu
├── Git
├── Python
├── Node
└── Developer tooling

For developers working across Windows, Linux, Azure and GitHub, this makes much more sense than treating the Cloud PC simply as another Windows desktop.

Final thoughts

I’ve been working with Windows 365 for quite some time, and this is one of the more interesting changes to the provisioning story for developer personas.

Previously, organisations basically had two choices:

Standard Microsoft image
+
install everything afterwards

or:

Build + patch + test +
maintain your own custom image

The Developer Configuration image introduces a useful middle ground.

Microsoft maintains the generic developer foundation, while organisations can layer their corporate requirements through Intune and Windows Autopilot Device Preparation.

There are still things I want to see evolve particularly application lifecycle management for the preinstalled developer tools and the preview status means I wouldn’t treat this as a finished production solution yet.

Thanks,
Aresh Sarkari

Windows 365 Cloud Apps — Publishing Apps (Part 2)

29 Sep

In Part 1 we built the provisioning policy and wired it to a group with size/capacity. In Part 2, we’ll actually publish the apps, tweak their details, undo changes when needed, and explain how licensing & concurrency work (with a simple diagram).

Where we work: All Cloud Apps

Once your first Frontline Cloud PC (Shared mode) finishes provisioning, the image’s Start-menu apps appear in Windows 365 → All Cloud Apps as Ready to publish.

You can: Publish, Edit, Reset, and Unpublish apps here. Deletion is tied to the policy assignment (more on that below).

Publish an app (All Cloud Apps)

  1. Intune Admin CenterDevicesWindows 365All Cloud Apps
  2. Pick one or more apps (Word, Excel, PowerPoint and Edge) with status Ready to publishPublish
  3. Watch the status flow:
    • Ready to publishPublishingPublished
  4. Once Published, the app appears in Windows App for all users assigned to the provisioning policy.
  • All Cloud Apps list (Ready → Publishing → Published)

If an app shows Failed: Unpublish it, then publish again. Check that the Start-menu shortcut on your image is valid (path/command still exists).

Edit an app (safe, instant updates)

For a published or ready app, select Edit to adjust:

  • Display name
  • Description
  • Command line (e.g., parameters)
  • Icon path index

Changes inherit scope tags & assignment from the provisioning policy, and updates are immediate in Windows App.

  • Edit dialog (name/description/command/icon index)

Reset an app (rollback to discovered state)

If you went too far with edits, use Reset to revert back to whatever was discovered from the image originally (name/icon/command). Great for quick experiments.

  • Reset confirmation

Unpublish (and how “delete” works)

  • Unpublish: App status goes Published → Ready to publish and the app disappears from Windows App. Its edited details are reset.
  • Delete: There isn’t a “delete app” button—Cloud Apps are discovered from the image. To truly remove an app from scope, remove the provisioning policy’s assignment (or update the image so the Start-menu shortcut no longer exists).
  • Unpublish action

Accessing apps (Windows App)

Users launch Windows App (Windows/macOS/iOS/Android) and see the Published apps. Selecting an app starts a session on a Frontline Cloud PC (Shared mode).

  • A published app can spawn other apps on that Cloud PC when needed (e.g., Outlook opening Edge from a link), even if the other app isn’t separately published.
  • To tightly control what can launch, use Application Control for Windows policies.
  • Windows App with your published apps visible
  • Launch flow (e.g., Outlook → Edge link)

Licensing & monitoring (Frontline Shared mode — explained)

Frontline (Shared mode) is built for brief, task-oriented access with no data persistence per user session. Think “one at a time” use of a shared Cloud PC.

The rules!

  • 1 Frontline license = 1 concurrent session.
  • You can assign many users to the policy, but only N can be active at once (where N = number of Frontline licenses you assigned to that policy).
  • When a user signs out, their data is deleted and the Cloud PC is free for the next user.
  • There’s no concurrency buffer for Frontline Shared mode (and none for GPU-enabled Cloud PCs).

Monitoring concurrency (what to look at)

  • Frontline connection hourly report: See active usage over time; verify you’re not hitting limits.
  • Frontline concurrency alert: Get notified if you breach your concurrency threshold.
  • Note: Concurrency buffer doesn’t apply to GPU or Frontline Shared Cloud PCs—plan capacity accordingly.

Practical sizing tip: Start with a license count that matches your peak simultaneous users for that group/policy. Watch the hourly report for a week, then adjust up/down.

Troubleshooting checklist

  • Published but not visible? Confirm the user is in the assigned group and is using the latest Windows App.
  • Failed on publish? Unpublish → Publish. Validate the Start-menu shortcut on the image and any custom command-line parameters.
  • Unexpected app launches (e.g., Edge opens)? That’s normal when an app calls another binary. Use Application Control if you must restrict it.
  • Hitting concurrency: Users 1..N can connect; N+1 waits. Increase Frontline licenses on the policy or split users into multiple policies sized per peak.

I hope you find this helpful information for creating a Cloud App. If I have missed any steps or details, I will be happy to update the post.

Thanks,
Aresh Sarkari

Windows 365 Cloud Apps – Provisioning Policy – PowerShell (Graph Rest API) – Part 1

26 Sep

This is part one of a two-part series on Windows 365 Cloud Apps. In this post, we’ll walk through what Cloud Apps are and how to create the provisioning policy with PowerShell. In part two, we’ll publish the apps themselves. I’ll also include the PowerShell script that uses Azure/Graph REST APIs.

What is Windows 365 Cloud Apps?

Windows 365 Cloud Apps let you give users access to specific apps streamed from a Cloud PC—without handing out a full desktop to everyone. Under the hood, Cloud Apps run on Windows 365 Frontline Cloud PCs in Shared mode. That licensing model is designed for shift or part-time staff: many users can be assigned, but only one active session per license at a time.

Think of it as “just-the-apps” VDI: Outlook, Word, your line-of-business app—delivered from the cloud—with the management simplicity of Windows 365 and Intune.

Why customers care: You streamline app delivery, lower overhead, and modernize VDI without building and babysitting a big remote desktop estate.

Cloud Apps vs AVD Published Apps vs “Traditional” VDI Published Apps

TopicWindows 365 Cloud AppsAzure Virtual Desktop Published AppsTraditional VDI Published Apps
What users seeIndividual apps streamed from a Cloud PC; no full desktopIndividual apps from session hosts in Azure Virtual DesktopIndividual apps from on-prem or hosted RDS/Horizon/Citrix farms
Infra you manageCloud PC lifecycle via Intune; Microsoft operates the fabricYou design & operate host pools, scaling, FSLogix, imagesYou run the farm: brokers, gateways, hypervisors, storage
Licensing / sessionsFrontline: many users per license, 1 active session per licensePer-user/per-device or CALs + Azure consumption; multiple sessions per hostPer-user/device + on-prem infra costs
Admin planeIntune + Windows 365Azure Portal + ARM + Host pool automationVendor consoles + on-prem change management
App packagingStart-menu discovered apps from the image (MSIX/Appx discovery expanding)MSI/MSIX; MSIX App Attach; image-basedMSI/MST/App-V/Citrix packages, etc.
Who it’s great forTask/shift workers; predictable, lightweight app accessBroad use cases; granular scale & controlHeavily customized legacy estates, on-prem constraints

Mental model:

If you need elastic host pools or platform primitives, choose AVD.

  • If you’re tied to on-prem or specific vendor features, you might keep traditional VDI, but expect more ops work.
  • If you like the “managed Cloud PC” experience and want app-only access, choose Cloud Apps.
  • If you like the “managed Cloud PC” experience and want app-only access, choose Cloud Apps.

PowerShell: create the policy via REST/Graph

  • Auth: Provide $TenantId, $ClientId, $ClientSecret from your app registration. Grant/admin-consent the scopes listed above. If you are not aware of how to create the app registration, you can follow here – How to register an app in Microsoft Entra ID – Microsoft identity platform | Microsoft Learn
  • Image: Set $ImageType (e.g., "gallery") and $ImageId for your chosen image.
  • Region: $RegionName (e.g., australiaeast or "automatic").
  • Assignment:
    • $GroupId: Entra group whose members should see the Cloud Apps.
    • $ServicePlanId: the Frontline size (e.g., FL 2vCPU/8GB/128GB in the example).
    • $AllotmentCount: how many concurrent sessions you want available for this policy.
    • $AllotmentDisplayName: a friendly label that shows up with the assignment.
  • Verification/Polling: The script dumps the policy with assignments and can optionally poll for provisioned Cloud PCs tied to the policy.
  • Get-or-Create a Cloud Apps provisioning policy (userExperienceType = cloudApp, provisioningType = sharedByEntraGroup, Azure AD Join in a specified region).
  • Assigns the policy to an Entra group with service plan, capacity (allotment), and a friendly label

Required permissions (app registration – admin consent):

  • CloudPC.ReadWrite.All (and CloudPC.Read.All)
  • DeviceManagementServiceConfig.ReadWrite.All (for policy config)
<#
Create (or reuse) a Windows 365 "Cloud Apps" provisioning policy, assign an Entra group
with size + capacity + label, then verify assignment (via $expand=assignments) and optionally
poll for provisioned Cloud PCs. Uses Microsoft Graph beta.

Key note: /assignments endpoint returns 404 by design; use $expand=assignments. See MS docs.
#>

# ==========================
# 0) CONFIG — EDIT THESE
# ==========================
$TenantId     = "<Copy/Paste Tenant ID>"
$ClientId     = "<Copy/Paste Client ID>"
$ClientSecret = "<Copy/Paste ClientSecret ID>"

# Policy
$DisplayName  = "Cloud-Apps-Prov-4"
$Description  = "Cloud Apps Prov Policy - Frontline"
$EnableSSO    = $true
$RegionName   = "australiaeast"   # or "automatic"
$Locale       = "en-AU"
$Language     = "en-AU"

# Image (gallery)
$ImageType    = "gallery"
$ImageId      = "microsoftwindowsdesktop_windows-ent-cpc_win11-24H2-ent-cpc-m365"

# Assignment
$GroupId              = "b582705d-48be-4e4b-baac-90e5b50ebdf2"   # Entra ID Group
$ServicePlanId        = "057efbfe-a95d-4263-acb0-12b4a31fed8d"   # FL 2vCPU/8GB/128GB
$AllotmentCount       = 1
$AllotmentDisplayName = "CP-FL-Shared-CloudApp-1"

# Optional provisioning poll
$VerifyDesiredCount   = $AllotmentCount
$VerifyMaxTries       = 30
$VerifyDelaySec       = 30

# ==========================
# Helpers
# ==========================
function New-GraphUri {
  param(
    [Parameter(Mandatory)][string]$Path,        # e.g. "/beta/deviceManagement/virtualEndpoint/provisioningPolicies"
    [hashtable]$Query
  )
  $cleanPath = '/' + ($Path -replace '^\s*/+','' -replace '\s+$','')
  $b = [System.UriBuilder]::new("https","graph.microsoft.com")
  $b.Path = $cleanPath
  if ($Query -and $Query.Count -gt 0) {
    Add-Type -AssemblyName System.Web -ErrorAction SilentlyContinue | Out-Null
    $nvc = [System.Web.HttpUtility]::ParseQueryString([string]::Empty)
    foreach ($k in $Query.Keys) { $nvc.Add($k, [string]$Query[$k]) }
    $b.Query = $nvc.ToString()
  } else { $b.Query = "" }
  return $b.Uri.AbsoluteUri
}

function Invoke-Graph {
  param(
    [Parameter(Mandatory)][ValidateSet('GET','POST','PATCH','DELETE','PUT')][string]$Method,
    [Parameter(Mandatory)][string]$Uri,
    [hashtable]$Headers,
    $Body
  )
  try {
    if ($PSBoundParameters.ContainsKey('Body')) {
      return Invoke-RestMethod -Method $Method -Uri $Uri -Headers $Headers -Body ($Body | ConvertTo-Json -Depth 20)
    } else {
      return Invoke-RestMethod -Method $Method -Uri $Uri -Headers $Headers
    }
  } catch {
    Write-Warning "HTTP $Method $Uri failed: $($_.Exception.Message)"
    try {
      $resp = $_.Exception.Response
      if ($resp -and $resp.GetResponseStream()) {
        $reader = New-Object IO.StreamReader($resp.GetResponseStream())
        $text   = $reader.ReadToEnd()
        Write-Host "Response body:" -ForegroundColor DarkYellow
        Write-Host $text
      }
    } catch {}
    throw
  }
}

# ==========================
# 1) AUTH — Client Credentials
# ==========================
$TokenEndpoint = "https://login.microsoftonline.com/$TenantId/oauth2/v2.0/token"
$tokenForm = @{
  client_id     = $ClientId
  client_secret = $ClientSecret
  scope         = "https://graph.microsoft.com/.default"
  grant_type    = "client_credentials"
}
$auth = Invoke-RestMethod -Method Post -Uri $TokenEndpoint -Body $tokenForm -ContentType 'application/x-www-form-urlencoded'
if (-not $auth.access_token) { throw "No access_token returned. Ensure CloudPC.ReadWrite.All (+ CloudPC.Read.All) are admin-consented." }

$Headers = @{
  Authorization = "Bearer $($auth.access_token)"
  "Content-Type" = "application/json"
  "Prefer"       = "include-unknown-enum-members"
}

# Base paths
$PoliciesPath = "/beta/deviceManagement/virtualEndpoint/provisioningPolicies"
$CloudPcsPath = "/beta/deviceManagement/virtualEndpoint/cloudPCs"

# ==========================
# 2) Ensure (Get-or-Create) the policy
# ==========================
$escapedName = $DisplayName.Replace("'","''")
$findUri     = New-GraphUri -Path $PoliciesPath -Query @{ '$filter' = "displayName eq '$escapedName'" }

Write-Host "Finding policy by name: $DisplayName" -ForegroundColor Cyan
try { $existing = Invoke-Graph -Method GET -Uri $findUri -Headers $Headers }
catch { Write-Warning "Name lookup failed; proceeding to create."; $existing = $null }

if ($existing -and $existing.value -and $existing.value.Count -gt 0) {
  $policy   = $existing.value | Select-Object -First 1
  $policyId = $policy.id
  Write-Host "Using existing policy '$DisplayName' (id: $policyId)" -ForegroundColor Yellow
} else {
  $createBody = @{
    "@odata.type"           = "#microsoft.graph.cloudPcProvisioningPolicy"
    displayName             = $DisplayName
    description             = $Description
    enableSingleSignOn      = $EnableSSO
    imageType               = $ImageType
    imageId                 = $ImageId
    managedBy               = "windows365"
    microsoftManagedDesktop = @{
      "@odata.type" = "microsoft.graph.microsoftManagedDesktop"
      managedType   = "notManaged"
    }
    windowsSetting          = @{
      "@odata.type" = "microsoft.graph.cloudPcWindowsSetting"
      locale        = $Locale
    }
    windowsSettings         = @{
      "@odata.type" = "microsoft.graph.cloudPcWindowsSettings"
      language      = $Language
    }
    userExperienceType      = "cloudApp"
    provisioningType        = "sharedByEntraGroup"
    domainJoinConfigurations = @(
      @{
        "@odata.type"  = "microsoft.graph.cloudPcDomainJoinConfiguration"
        domainJoinType = "azureADJoin"
        type           = "azureADJoin"
        regionName     = $RegionName
      }
    )
  }

  $createUri = New-GraphUri -Path $PoliciesPath
  Write-Host "Creating policy '$DisplayName'..." -ForegroundColor Cyan
  $policy   = Invoke-Graph -Method POST -Uri $createUri -Headers $Headers -Body $createBody
  $policyId = $policy.id
  if (-not $policyId) { throw "Create succeeded but no policy id returned." }
  Write-Host "Created policy id: $policyId" -ForegroundColor Green
}

# ==========================
# 3) Assign — group + size + capacity + label
# ==========================
$assignUri = New-GraphUri -Path ($PoliciesPath + "/$policyId/assign")

Write-Host "Clearing existing assignments..." -ForegroundColor DarkGray
Invoke-Graph -Method POST -Uri $assignUri -Headers $Headers -Body @{ assignments = @() } | Out-Null

$assignBody = @{
  assignments = @(
    @{
      target = @{
        "@odata.type"          = "#microsoft.graph.cloudPcManagementGroupAssignmentTarget"
        groupId                = $GroupId
        servicePlanId          = $ServicePlanId
        allotmentLicensesCount = $AllotmentCount
        allotmentDisplayName   = $AllotmentDisplayName
      }
    }
  )
}
Write-Host "Assigning policy to group $GroupId (plan $ServicePlanId, count $AllotmentCount)..." -ForegroundColor Cyan
Invoke-Graph -Method POST -Uri $assignUri -Headers $Headers -Body $assignBody | Out-Null
Write-Host "Assignment submitted." -ForegroundColor Green

# ==========================
# 4) Verify — read policy with $expand=assignments (RETRY)
# ==========================
$expandUri = New-GraphUri -Path ($PoliciesPath + "/$policyId") -Query @{ '$expand' = 'assignments' }
Write-Host "Reading back policy + assignments via $expand..." -ForegroundColor Cyan

$verify = $null
for ($try=1; $try -le 12; $try++) {
  try {
    $verify = Invoke-Graph -Method GET -Uri $expandUri -Headers $Headers
    if ($verify.assignments -and $verify.assignments.Count -gt 0) { break }
    Write-Host "Assignments not materialized yet (attempt $try). Waiting 3s..." -ForegroundColor Yellow
  } catch {
    Write-Warning "Expand read attempt $try failed; retrying in 3s..."
  }
  Start-Sleep -Seconds 3
}
if (-not $verify) { throw "Failed to read policy with assignments after retries." }

$verify | ConvertTo-Json -Depth 20 | Write-Output

# Sanity: confirm the expected assignment
$expected = $verify.assignments | Where-Object {
  $_.target.groupId -eq $GroupId -and
  $_.target.servicePlanId -eq $ServicePlanId -and
  $_.target.allotmentLicensesCount -eq $AllotmentCount -and
  ($_.target.allotmentDisplayName -eq $AllotmentDisplayName -or -not $AllotmentDisplayName)
}
if ($expected) {
  Write-Host "✅ Assignment present with expected group, plan, and count." -ForegroundColor Green
} else {
  Write-Warning "Assignment not found with expected fields. See dump above."
}

# ==========================
# 5) (Optional) Poll for provisioned Cloud PCs for this policy
# ==========================
if ($VerifyDesiredCount -gt 0) {
  $cloudPcsUri = New-GraphUri -Path $CloudPcsPath -Query @{ '$filter' = "provisioningPolicyId eq '$policyId'" }
  for ($i = 1; $i -le $VerifyMaxTries; $i++) {
    try {
      $cloudPcs   = Invoke-Graph -Method GET -Uri $cloudPcsUri -Headers $Headers
      $pcsForPlan = $cloudPcs.value | Where-Object { $_.servicePlanId -eq $ServicePlanId -or -not $_.psobject.Properties.Name.Contains('servicePlanId') }
      $count      = ($pcsForPlan | Measure-Object).Count
      if ($count -ge $VerifyDesiredCount) {
        Write-Host "Provisioned Cloud PCs for policy: $count (target $VerifyDesiredCount) ✅" -ForegroundColor Green
        $pcsForPlan | ConvertTo-Json -Depth 10 | Write-Output
        break
      } else {
        Write-Host "Provisioned Cloud PCs for policy: $count (waiting for $VerifyDesiredCount) … attempt $i/$VerifyMaxTries" -ForegroundColor Yellow
      }
    } catch {
      Write-Warning "Provisioning check failed on attempt ${i}: $($_.Exception.Message)"
    }
    Start-Sleep -Seconds $VerifyDelaySec
  }
}

GitHub Link – avdwin365mem/W365-CloudApp-Prov-Policy at main · askaresh/avdwin365mem

Provisioning Policy Details – UI

Policy

Overview

Tips, gotchas, and troubleshooting

  • App discovery: Ensure the app has a Start menu shortcut on the image. That’s how Cloud Apps gets its list.
  • Security baselines: If your tenant enforces restrictions on PowerShell in the image at discovery time, discovery can fail.
  • MSIX/Appx: Discovery is expanding—classic installers show up first; some Appx/MSIX apps (e.g., newer Teams) may not appear yet.
  • Concurrency math: Active sessions for the policy are capped by assigned Frontline license count on that policy.
  • Schema drift: These are beta endpoints. If you hit a property/enum change, the script’s warnings will surface the response body—update the field names accordingly.

What’s next (Part 2)

We’ll move to All Cloud Apps to publish the discovered apps, tweak display name/description/command line/icon index, confirm they appear in Windows App, and cover unpublish/reset workflows—with your screenshots.

I hope you find this helpful information for creating a Cloud App using PowerShell. If I have missed any steps or details, I will be happy to update the post.

Thanks,
Aresh Sarkari

Cloud PC Maintenance Windows: Scheduling Resize Operations for Maximum Efficiency + Bonus Microsoft Graph Powershell way of implementation

3 Mar

Today I’m diving into a feature that’s currently in preview but promises to be super useful for Windows 365 Cloud PC admins: Cloud PC Maintenance Windows.

If you’ve ever needed to resize multiple Cloud PCs but worried about disrupting users during work hours, this new feature is about to make your life much easier. Let’s break it down!

What Are Cloud PC Maintenance Windows?

Simply put, maintenance windows allow you to schedule when certain actions (currently just resize operations) will take place on your Cloud PCs. Instead of changes occurring immediately after you initiate them, you can schedule them to run during specified time periods.

Think of it as telling your Cloud PCs, “Hey, only accept these maintenance actions during these specific hours.” It’s perfect for organizations that need to plan around busy periods and minimize disruption.

Why You Should Care About This Feature

There are several compelling reasons to start using maintenance windows:

  • After-hours maintenance: Schedule resize operations to happen overnight or on weekends
  • Predictable changes: Users receive notifications before maintenance begins
  • Bulk operations: Apply resize actions to entire departments or teams at once
  • Organizational compliance: Meet any requirements about when system changes can occur

Setting Up Your First Maintenance Window

The setup process is straightforward and consists of two main parts: creating the window itself and then applying it to a device action.

Part 1: Creating a Maintenance Window

  • Sign into the Microsoft Intune admin center
  • Navigate to Tenant administration > Cloud PC maintenance windows (preview)
  • Click Create
  • On the Basics page:
    • Enter a descriptive Name (e.g., “Weekend Resize Window”)
    • Add a Description to help other admins understand the purpose
  • On the Configuration page:
    • Set your Weekday schedule (if applicable)
    • Set your Weekend schedule (if applicable)
    • Remember: Each window must be at least two hours long
    • Select when users will receive notifications (15 minutes to 24 hours in advance)
  • On the Assignments page:
    • Add the groups whose Cloud PCs will use this maintenance window
  • Review your settings and click Create

Part 2: Using Your Maintenance Window

Once your window is created, it won’t do anything by itself until you create a bulk device action that uses it:

  • In the Intune admin center, go to Devices > Windows Devices > Bulk device actions
  • For the configuration:
    • OS: Windows
    • Device type: Cloud PCs
    • Device action: Resize
  • Select your source and target sizes
  • Important: Check the box for Use Cloud PC maintenance windows
  • Add the devices/groups and create the action

When the maintenance window becomes active, the resize operation will run, and users will receive notifications based on the lead time you specified.

Powershell way to implement Cloud PC maintence

Step 1 – Install the MS Graph Beta Powershell Module

#Install Microsoft Graph Beta Module
PS C:WINDOWSsystem32> Install-Module Microsoft.Graph.Beta

Step 2 – Connect to scopes and specify which API you wish to authenticate to. If you are only doing read-only operations, I suggest you connect to “CloudPC.Read.All” in our case, we are creating the policy, so we need to change the scope to “CloudPC.ReadWrite.All”

#Read-only
PS C:WINDOWSsystem32> Connect-MgGraph -Scopes "CloudPC.Read.All" -NoWelcome
Welcome To Microsoft Graph!

OR

#Read-Write
PS C:WINDOWSsystem32> Connect-MgGraph -Scopes "CloudPC.ReadWrite.All" -NoWelcome
Welcome To Microsoft Graph!
Permissions for MS Graph API

Step 3 –  Check the User account by running the following beta command.

#Beta APIs
PS C:WINDOWSsystem32> Get-MgBetaUser -UserId admin@wdomain.com

Create Cloud Maintenace Policy Window

We are creating a provisioning policy that involves the following: avdwin365mem/createcloudpcmaintwindow at main · askaresh/avdwin365mem

  • displayname – Name of the policy “CloudPC-Window-askaresh”
  • Description – Enter details to remember for the future
  • notification – 60 min (tweak based on your company policies)
  • Schedule – Weekday (Ensure don’t enter business hours)
# Ensure the Microsoft.Graph.Beta module is installed
if (-not (Get-Module -ListAvailable -Name Microsoft.Graph.Beta)) {
    Write-Host "Installing Microsoft.Graph.Beta module..." -ForegroundColor Cyan
    Install-Module Microsoft.Graph.Beta -Force -AllowClobber
}
Import-Module Microsoft.Graph.Beta

# Connect to Microsoft Graph with the required permissions for maintenance operations
Write-Host "Connecting to Microsoft Graph..." -ForegroundColor Cyan
Connect-MgGraph -Scopes "CloudPC.ReadWrite.All" -NoWelcome

# Define the endpoint for Cloud PC maintenance windows
$uri = "beta/deviceManagement/virtualEndpoint/maintenanceWindows"

# Construct the JSON payload for the maintenance window
$maintenancePayload = @{
    displayName                   = "CloudPC-Window-askaresh"
    description                   = "A window for test"
    notificationLeadTimeInMinutes = 60
    schedules                     = @(
        @{
            scheduleType = "weekday"
            startTime    = "01:00:00.0000000"
            endTime      = "04:00:00.0000000"
        },
        @{
            scheduleType = "weekend"
            startTime    = "01:00:00.0000000"
            endTime      = "04:00:00.0000000"
        }
    )
} | ConvertTo-Json -Depth 5

# Call the Microsoft Graph API to create the maintenance window
try {
    Write-Host "Creating Cloud PC maintenance window..." -ForegroundColor Cyan
    $result = Invoke-MgGraphRequest -Method POST -Uri $uri -Body $maintenancePayload
    Write-Host "Maintenance window created successfully." -ForegroundColor Green
    $result | Format-List
}
catch {
    Write-Error "Error creating maintenance window: $_"
}

# Optionally disconnect from Microsoft Graph when done
Disconnect-MgGraph

The User Experience

From the user perspective, they’ll receive a notification in their Cloud PC session when a maintenance window is approaching. The notification will indicate that maintenance is scheduled and when it will occur. They can’t override or postpone the maintenance, but at least they’ll be prepared.

Current Limitations

It’s worth noting that this feature is still in preview, and has some limitations:

  • Currently only supports resize operations (likely to expand in the future)
  • The maintenance window itself doesn’t guarantee the success of operations
  • Doesn’t handle Windows updates, Intune payloads, or OS updates
  • Each window must be at least two hours long

When NOT to Use Maintenance Windows

If you have an urgent situation requiring immediate resizing of Cloud PCs, simply don’t check the “Use Cloud PC maintenance windows” box when creating your bulk action. This way, the resize will happen immediately rather than waiting for the next scheduled window.

Conclusion

Having played with this feature for a bit, I’m impressed with how it streamlines the management of Cloud PCs. Before this, scheduling maintenance was much more manual and potentially disruptive. While I wish it supported more actions beyond just resizing, this is a solid foundation that I expect Microsoft will build upon.

This feature is particularly valuable for organizations with users across different time zones or with strict requirements about when system changes can occur. It’s also a huge time-saver for admins who manage large fleets of Cloud PCs. I hope you find this helpful information for creating a Cloud PC maintenance window using PowerShell. If I have missed any steps or details, I will be happy to update the post.

Thanks,
Aresh Sarkari

PowerShell – Shared Frontline Workers – Create Windows 365 Cloud PC Provisioning Policy

11 Feb

I have a blog post about creating a dedicated PowerShell – Frontline Workers – Create Windows 365 Cloud PC Provisioning Policy | AskAresh. In this post blog, I will demonstrate how to create the provisioning policy using PowerShell and MS Graph API with beta modules for Windows 365 Cloud PC – Shared Frontline Workers.

Introduction

I will not attempt to explain Frontline, but the best explanation is here: What is Windows 365 Frontline? | Microsoft Learn.

Example – With Windows 365 Frontline Shared licensing, you don’t assign a license to each individual user. Instead, you provision a pool of shared virtual desktops and grant access to a designated group of users. Each shared license represents a virtual desktop that can be dynamically used by any authorized user when available. For example, rather than needing a strict 1:1 (or even 1:3) mapping between users and desktops, you can support many more employees than the number of desktops you provision—much like a traditional non-persistent VDI setup. Once a user logs off, their desktop resets and becomes available for another user, allowing you to meet peak concurrency needs without assigning a dedicated device to every single employee.

Connect to MS Graph API

Step 1 – Install the MS Graph Beta Powershell Module

#Install Microsoft Graph Beta Module
PS C:WINDOWSsystem32> Install-Module Microsoft.Graph.Beta

Step 2 – Connect to scopes and specify which API you wish to authenticate to. If you are only doing read-only operations, I suggest you connect to “CloudPC.Read.All” in our case, we are creating the policy, so we need to change the scope to “CloudPC.ReadWrite.All”

#Read-only
PS C:WINDOWSsystem32> Connect-MgGraph -Scopes "CloudPC.Read.All" -NoWelcome
Welcome To Microsoft Graph!

OR

#Read-Write
PS C:WINDOWSsystem32> Connect-MgGraph -Scopes "CloudPC.ReadWrite.All" -NoWelcome
Welcome To Microsoft Graph!
Permissions for MS Graph API

Step 3 –  Check the User account by running the following beta command.

#Beta APIs
PS C:WINDOWSsystem32> Get-MgBetaUser -UserId admin@wdomain.com

Create Provisioning Policy (Frontline Shared Worker)

We are creating a provisioning policy that involves the following: avdwin365mem/win365sharedfrontlineCreateProvPolicy at main · askaresh/avdwin365mem

  • Azure AD Joined Cloud PC desktops
  • The region for deployment – Australia East
  • Image Name – Windows 11 Enterprise + Microsoft 365 Apps 24H2 (from the Gallery)
  • Language & Region – English (United States)
  • Network – Microsoft Managed
  • SSO – True
  • the biggest change for share front like is this provisioningType = “sharedByEntraGroup”
  • Cloud PC Naming format – FLWS-%RAND:10% (FLSW – Frontline Worker Shared)
$params = @{
	displayName = "Demo-Shared-FrontLine"
	description = "Shared Front Line Workers Prov Policy"
	provisioningType = "sharedByEntraGroup"
	managedBy = "windows365"
	imageId = "microsoftwindowsdesktop_windows-ent-cpc_win11-24H2-ent-cpc-m365"
	imageDisplayName = "Windows 11 Enterprise + Microsoft 365 Apps 24H2"
	imageType = "gallery"
	microsoftManagedDesktop = @{
		type = "notManaged"
		profile = $null
	}
	enableSingleSignOn = $true
	domainJoinConfigurations = @(
		@{
			type = "azureADJoin"
			regionGroup = "australia"
			regionName = "australiaeast"
		}
	)
	windowsSettings = @{
		language = "en-US"
	}
	cloudPcNamingTemplate = "FLWS-%RAND:10%"
}

New-MgBetaDeviceManagementVirtualEndpointProvisioningPolicy -BodyParameter $params

The policy will show up in the Intune Portal

Optional Properties

If you are doing on-premise network integration (Azure Network Connection) , then the following additional property and value is required. In my lab, I am leveraging the Microsoft Managed Network, so this is not required.

OnPremisesConnectionId = "4e47d0f6-6f77-44f0-8893-c0fe1701ffff"

Additionally, if you have enrolled into autopatch the following is the parameter. You will have to put the name from the Intune Portal.

            "autopatch": null,

I hope you will find this helpful information for creating a shared frontline worker provisioning policy using PowerShell. Please let me know if I have missed any steps or details, and I will be happy to update the post.

Thanks,
Aresh Sarkari

Windows Intune Settings Catalog Policy to Disable Windows Copilot – Windows 365 Cloud PC & Windows 11 + Bonus PowerShell

28 Feb

In the latest update of Windows Intune, a new method has been introduced to disable Windows Copilot through the settings catalog policy. Previously, the technique revolved around CSP and registry, but now users can conveniently manage this setting directly within the settings catalog. There are plenty of blog posts showing how to do it via CSP and registry, and we are not going into that here.

What is Windows Copilot?

For those unfamiliar, Windows Copilot (formerly Bing Chat) is a built-in AI-powered intelligent assistant that helps you get answers and inspirations from across the web, supports creativity and collaboration, and enables you to focus on the task at hand.

How to Disable Windows Copilot via Settings Catalog Policy

The process to disable Windows Copilot through the settings catalog policy is simple and straightforward. Here’s a step-by-step guide:

  • Log in to the Microsoft Intune admin center.
  • Create a configuration profile for Windows 10 and later devices with the Settings catalog and slect Create
  • Enter the profile Name “DisableCopilot” and Description “Settings to disable Copilot” and select Next
  • Under the Setting Picker select category as Windows AI and select the setting “Turn off Copilot in Windows (user).”
  • Next Within the settings select the silder and “Disable the Copilot settings”
  • Assign the Policy to a Windows 365 or Windows 11 Device group

By following these steps, administrators can effectively manage the Windows Copilot setting for their organization’s devices.

Validation

Now after sometime login to your Windows 365 CloudPC or Windows 11 device and the Copilot Icon will disappear from the TaskBar

Bonus (PowerShell)

If you want to create the above policy using PowerShell and MS Graph you can run the below code:

# Import necessary modules
Import-Module Microsoft.Graph.Beta.Groups
Import-Module Microsoft.Graph.Beta.DeviceManagement

# Define parameters for the new device management configuration policy
$params = @{
name = "DisableCopilot"
description = "Disable AI copilot"
platforms = "windows10"
technologies = "mdm"
roleScopeTagIds = @(
"0"
)
settings = @(
@{
"@odata.type" = "#microsoft.graph.deviceManagementConfigurationSetting"
settingInstance = @{
"@odata.type" = "#microsoft.graph.deviceManagementConfigurationChoiceSettingInstance"
settingDefinitionId = "user_vendor_msft_policy_config_windowsai_turnoffwindowscopilot"
choiceSettingValue = @{
"@odata.type" = "#microsoft.graph.deviceManagementConfigurationChoiceSettingValue"
value = "user_vendor_msft_policy_config_windowsai_turnoffwindowscopilot_1"
children = @()
}
}
}
)
}

# Create a new device management configuration policy with the specified parameters
New-MgBetaDeviceManagementConfigurationPolicy -BodyParameter $params

Check out my other blog post that outlines how to use MS Graph and Powershell to execute the above code.

I hope you’ll find this insightful for easily disabling the Copilot within the Windows 11 physical and Windows 365 Cloud PC fleet of device. Please let me know if I’ve missed any steps or details, and I’ll be happy to update the post.

Thanks,
Aresh Sarkari

Customizing Branding for Windows 365 Boot Sign-in Screen

20 Feb

If you’re looking to customize the branding displayed at the top of the sign-in screen for Windows 365 Boot, you’re in the right place. In a previous workflow within the Intune Portal, I deployed the Windows 365 Boot and all I needed was to incorporate the company logo, text, and lock screen wallpaper.

Image

Key Steps for Customization

Pre-created Configuration Policy(Windows 365 Boot)

I have decided I will modify the existing Windows 365 configuration profiles that was originally deployed during the W365 Boot deployment.

  • Policy Name – Whatever Prefix(W365Boot) Windows 365 Boot Shared PC Device Configuration Policy

Configuration Policy Update (Company Name, Logo and Lock Screen Image)

To customize the login screen on the Windows 365 Boot PC, follow these detailed steps:

  1. Log in to the Microsoft Intune admin center.
  2. Create or edit a configuration profile for Windows 10 and later devices with the Settings catalog profile type, specifically for the “W365Boot Windows 365 Boot Shared PC Device Configuration Policy”.
  3. Click on edit on “Configuration Settings” and select “Add.”
  4. Enter the details within the table for the OMA-URI and values:
    • Upload your company logo in the specified format and size.
    • Enter your company name in the designated field.
    • Save your changes and ensure they are applied to the login screen.
NameOMA-URIFormatValue
CompanyName./Vendor/MSFT/Personalization/CompanyNamestringAskAresh.com
CompanyLogoUrl./Vendor/MSFT/Personalization/CompanyLogoUrlstringhttps://i0.wp.com/askaresh.com/wp-content/uploads/2020/05/askaresh-logo_200x200.png
LockScreenImageUrl./Vendor/MSFT/Personalization/LockScreenImageUrlstringhttps://itsupportla.com/files/2022/08/Windows-3652.jpg
Image

This straightforward process allows you to personalize the login experience for your Windows 365 users, enhancing your company’s branding and identity.

Company Name and Logo

See how the Name and Logo appear on the Windows 365 Boot Physical PC.

Image

LockScreen Logo

Check out how the Lock Screen appears on the Windows 365 Boot Physical PC.

Image

I trust you’ll find this insightful for customizing the end-user experience on the physical Windows 365 Boot device. Please let me know if I’ve missed any steps or details, and I’ll be happy to update the post.

Thanks,
Aresh Sarkari

Windows 365 – Report – Cloud PC actions + PowerShell Report Download

18 Dec

In the Dec 4th, 2023 for Windows 365 Enterprise, the reports for Cloud PC actions were announced. In today’s post, I will showcase how to access and make sense of the new report available within Microsoft Intune.

What does the report offer?

The Cloud PC Actions Report, currently in public preview, is a powerful report within the Windows 365 ecosystem. It provides detailed information on various actions taken by administrators on the Cloud PCs. Imagine you have multiple teams and admins within your organisation. This report can help you track the actions along with the Status and Date initiated, which can come in handy for troubleshooting and audit purposes.

Accessing the report – Cloud PC Actions

To view the report in Microsoft Intune portal, you can follow these steps:

What Actions are displayed?

The following actions are included in the report:

ActionDescription
Create SnapshotThis action allows administrators to capture the current state of a Cloud PC. It’s useful for backup purposes or before making significant changes, ensuring that there’s a point to revert back to if needed.
Move RegionThis feature enables the relocation of a Cloud PC to a different geographic region. It’s particularly beneficial for organizations with a global presence, ensuring that Cloud PCs are hosted closer to where the users are located, potentially improving performance and compliance with regional data laws.
Place Under ReviewThis action is used to flag a Cloud PC for further examination. It could be due to performance issues, security concerns, or compliance checks. Placing a PC under review may restrict certain functionalities until the review is completed.
Power On/Off (W365 Frontline only)Specific to Windows 365 Frontline, this action allows administrators to remotely power on or off a Cloud PC. This is crucial for managing devices in a frontline environment, where PCs might need to be controlled outside of regular working hours.
ReprovisionReprovisioning a Cloud PC involves resetting it to its initial state. This action is useful when a PC needs to be reassigned to a different user or if it’s experiencing significant issues that can’t be resolved through regular troubleshooting.
ResizeThis action refers to changing the size/specifications of a Cloud PC, such as adjusting its CPU, RAM, or storage. It’s essential for adapting to changing workload requirements or optimizing resource allocation.
RestartAdministrators can remotely restart a Cloud PC. This is a basic but critical action for applying updates, implementing configuration changes, or resolving minor issues.
RestoreThis action allows the restoration of a Cloud PC to a previous state using a saved snapshot. It’s a vital feature for recovery scenarios, such as after a failed update or when dealing with software issues.
TroubleshootThis is a general action that encompasses various diagnostic and repair tasks to resolve issues with a Cloud PC. It might include running automated diagnostics, checking logs, or applying fixes.

How This Report Benefits You

  • Enhanced Troubleshooting: Quickly identify failed actions and understand potential reasons for failure.
  • Efficient Management: Monitor ongoing actions and ensure smooth operation of Cloud PCs.
  • Actionable Insights: Make informed decisions based on the status and details of actions taken.

If you have a failed action you can select and click on retry and it will try to perform the action on your behalf.

Bonus – PowerShell Access to Cloud PC Actions Report

To get the csv download of the report via MS Graph follow these steps:

Connect to MS Graph API

Step 1 – Install the MS Graph Powershell Module

#Install Microsoft Graph Beta Module

PS C:WINDOWSsystem32> Install-Module Microsoft.Graph.Beta

Step 2 – Connect to scopes and specify which API you wish to authenticate to. If you are only doing read-only operations, I suggest you connect to “CloudPC.Read.All” in our case, we are creating the policy, so we need to change the scope to “CloudPC.ReadWrite.All”

#Read-only

PS C:WINDOWSsystem32> Connect-MgGraph -Scopes "CloudPC.Read.All" -NoWelcome
Welcome To Microsoft Graph!

OR

#Read-Write
PS C:WINDOWSsystem32> Connect-MgGraph -Scopes "CloudPC.ReadWrite.All" -NoWelcome
Welcome To Microsoft Graph!

Step 3 – Check the User account by running the following beta command.

#Beta APIs

PS C:WINDOWSsystem32> Get-MgBetaUser -UserId admin@wdomain.com

Download the csv Report

You will pass the following $prams variable with all the fields within the report. GitHub link – avdwin365mem/cloudpcactionreport at main · askaresh/avdwin365mem (github.com)

$params = @{

top = 50
skip = 0
search = ""
filter = ""
select = @(
"Id"
"CloudPcId"
"CloudPcDeviceDisplayName"
"DeviceOwnerUserPrincipalName"
"Action"
"ActionState"
"InitiatedByUserPrincipalName"
"RequestDateTime"
"LastUpdatedDateTime"
)
orderBy = @(
"LastUpdatedDateTime desc"
)
}

Get-MgBetaDeviceManagementVirtualEndpointReportActionStatusReport -BodyParameter $params

The Cloud PC Actions Report is a significant addition to Windows 365, offering a level of transparency and control that administrators have long sought. I hope you will find this helpful information for tracking the Cloud PC actions via this report. Please let me know if I have missed any steps or details, and I will be happy to update the post.

Thanks,
Aresh Sarkari

Windows 365 – Report – Connected Frontline Cloud PCs

8 Sep

In the Aug 28, 2023 release and Dec 4th, 2023 for Windows 365 Enterprise, the reports for Connected Frontline Cloud PCs were announced. In today’s post, I will showcase how to access and make sense of the new report available within Microsoft Intune.

What does the report offer?

The primary aim of the Connected Frontline Cloud PCs report is to provide clarity on concurrent connections based on each frontline Cloud PC. This is crucial for businesses and IT Admins to understand their usage patterns and ensure they have the correct number of licenses. By analyzing the maximum concurrent connections, we can determine if there’s a need to acquire more licenses. This ensures that end users have uninterrupted access to their Frontline Cloud PCs. You can read more about Frontline Cloud PC provisioning in my previous blog post – PowerShell – Frontline Workers – Create Windows 365 Cloud PC Provisioning Policy | AskAresh

Accessing the report – Connected Frontline Cloud PCs

To view the report in Microsoft Intune portal, you can follow these steps:

  • Login to the Microsoft Intune admin center.
  • If you don’t have the necessary permissions to manage Windows 365. You will also need these two roles to view the report (SharedUseLicenseUsageReport and SharedUseServicePlans)
  • Go to Devices > Overview > Cloud PC performance (preview) > You will find the report name Connected Frontline Cloud PCs. > Select View report

I have two licenses for Windows 365 Frontline Cloud PCs in my lab. I have four provisioned Cloud PCs. However, the maximum Cloud PCs that can be connected and worked upon simultaneously are two.

Scenario 1 – One Frontline Cloud PC connected out of my total two licenses

There is no warning here when one frontline Cloud PC is connected.

Scenario 2 – Two Frontline Cloud PC connected out of my total two licenses

You can see a warning stating you have reached the concurrency limit. The third session of frontline cloud PC will not be allowed.

Concurrent Frontline Cloud PC Connections

This is how the overall report looks when you click on the Cloud PC Size. The report aggregates data for the last 28 days and showcases:

  • The current number of connected Frontline Cloud PCs.
  • The maximum number of connected Frontline Cloud PCs for each day within the selected range (either 7 or 28 days).
  • The maximum concurrency limit.
  • Warnings when nearing or reaching the maximum concurrency limit.

It’s worth noting that this report is tailored for Windows 365 Frontline. If a business hasn’t purchased any Windows 365 Frontline licenses, the report will remain empty.

New Filter (Frequency – Hourly)

In the Dec 2023 release the new filter which shows hourly data for the consumption of the Frontline Worker desktops. Understanding usage patterns on an hourly basis, allows for more precise planning and ensures that resources and licenses are allocated efficiently. This is especially important for organizations relying heavily on Frontline Cloud PCs, where even minor disruptions can lead to significant workflow challenges.

This is how the Hourly Report will look like and you will be able to make the decision based on usage:

I hope you will find this helpful information for estimating and tracking the frontline worker concurrent usage via this report. Please let me know if I have missed any steps or details, and I will be happy to update the post.

Thanks,
Aresh Sarkari

Watermarking & Session Capture Protection in Azure Virtual Desktop using Microsoft Intune and Azure AD Joined devices

31 Aug

In the July 2023 release for Azure Virtual Desktop, the Watermarking and Session capture protection features became generally available. Numerous blog posts already showcase how to enable the feature using Group Policy. In today’s post, I will showcase how to enable Watermarking and Session Capture protection using Microsoft Intune for Session Host Virtual machines that are Azure AD joined.

Prerequisites

You’ll need the following things ready before you can rollout watermarking/session capture protection:

  • Azure Virtual Desktop: You must have Azure Virtual Desktop deployed (Pooled or Personal Desktops) and set up in your Azure environment.
  • Microsoft Intune: You should have an active subscription to Microsoft Intune, which is a cloud-based service that enables device management and security. The role within Intune Portal for creating and assigning the configuration profiles is – Policy and Profile manager built-in role-based access control (RBAC) role.
  • Azure Active Directory: Your Azure Virtual Desktop environment should be integrated with Azure Active Directory (AD) (The Host pools RDP properties – targetisaadjoined:i:1). The AAD Security groups must be in place, which has the members as the session’s host in AVD.
  • Azure AD Joined Devices: The session host virtual machines (VMs) you want to enable Watermarking and Session Capture protection for should be Azure AD joined. This means they must be connected to Azure AD and registered as members of your organization’s directory.
  • Admin Access: You need administrative access to the Azure portal (https://portal.azure.com) and Microsoft Intune (https://intune.microsoft.com).
  • Windows 11 operating system for the client along with the Azure Virtual Desktop Client or Remote Desktop Client versions 1.2.x and higher

Configuration Profiles – Intune

To enable the Watermarking and Session Capture protection features in Azure Virtual Desktop using Microsoft Intune Configuration profiles and Azure AD joined devices, you can follow these steps:

  • In the settings picker, browse to Administrative templates > Windows Components > Remote Desktop Services > Remote Desktop Session Host > Azure Virtual Desktop. You should see settings in the Azure Virtual Desktop subcategory available for you to configure, such as “Enable watermarking” and “Enable screen capture protection”
  • Select the “Enable screen capture protection” settings, too and leave the values as defaults. (Feel free to tweak it based on your requirements)
  • Assigning the configuration to the AAD group, which has all the session host devices
  • Reboot the session host after applying or wait until the next maintenance cycle

Client Validation

Connect to a remote session with a supported client (Azure Virtual Desktop Client or Remote Desktop Client versions 1.2.x), where you should see QR codes appear.

The QR code only works for Windows 11 Multi-session\Windows 11 Enterprise (pooled or personal desktops). The RemoteApps will not show the QR code as its not supported.

Screenshot protection – In the session, it will be completely blank if you try to take a screenshot. Below is an example. I was trying to take a screenshot of the text file, and the screenshot was completely blank.

Mobile Phone Photo

When you try to take a screenshot from the mobile phone, this is how it will look, and it will pop the Connection ID. You have this connection ID you can match in Azure Insights.

Azure Virtual Desktop Insights

To find out the session information from the QR code by using Azure Virtual Desktop Insights:

  1. Open a web browser and go to https://aka.ms/avdi to open Azure Virtual Desktop Insights. Sign-in using your Azure credentials when prompted.
  2. Select the relevant subscription, resource group, host pool and time range, then select the Connection Diagnostics tab.
  3. In the section Success rate of (re)establishing a connection (% of connections), there’s a list of all connections showing First attemptConnection IdUser, and Attempts. You can look for the connection ID from the QR code in this list, or export to Excel.

I hope you will find this helpful information for getting started with Watermarking and Screenshot protection for the Azure Virtual Desktop – Session Host. Please let me know if I have missed any steps or details, and I will be happy to update the post.

Thanks,
Aresh Sarkari