Upon further digging, the conflict is caused because of the out-of-the-box Windows 365 Security Baseline. which includes a similar policy under Remote Desktop Services.
Go to the Device (CPC-aresh-eo0fg) of concern and navigate into the Device configuration. We can see there is a conflict between the previously created RDP Device Redirection (config profiles) and the out-of-the-box Windows 365 Security Baseline (Preview)
Fix forward
I kept the Windows 365 Security Baseline untouched, changed the Configurations Profiles, edited the policy, and removed the duplicate setting on “Block drive redirection”. This resolved the conflict situation
I hope you will find this helpful information for troubleshooting a conflict of policies VS baselines. Please let me know if I have missed any steps or details, and I will be happy to update the post.
In this post, we will look into the Windows 365 Cloud PC RDP Device Restrictions. The reason we apply these settings is to control pheripherals like Camera, USB Drives Printers etc. We have a few settings which we can fine-tune to derive the best possible end-user and security outcome for the Cloud PC devices.
We have the following settings to enable/disable within using the RDP Device redirections settings. We can apply them using ADMX or Intune – Settings Catalog. In this post, we shall be looking into Intune – Settings Catalog.
RDP Device Redirection Settings – Win365 Cloud PC
Enable these Setting in Intune
Navigate to Microsoft Itune Portal — Devices — Configuration profiles
Select Create a Profile
Platform – Windows 10 and later
Profile type – Settings catalog
Name – CloudPCDeviceRedirection
Optional – Description
Click on — Add Settings
I want to emphasize using Filters for the Settings you are implementing as few can be for Multi-user, Devices or Users and knowing which one we are targeting is significant
Choosing the Scope Device within your filter as the RDP Redirection policies are device-based
Now using the search function, we will search for – Printer Redirection (We have 4 settings for devices)
Next using the search function, we will search for – Device and Resource Redirection (We have 12 settings for devices)
Overall the following settings can be tweaked for Device & Remote Desktop Redirection
Depending on your requirements, you can enable and disable all the above settings, such as Clipboard, USB, and TimeZone redirection. Assign the policy to the User or groups of your choice within assignments.
I hope you will find this helpful information for the RDP device restrictions of the CloudPC using Configuration profiles. Please let me know if I have missed any steps or details, and I will be happy to update the post.
A safety feature within MEM Portal – Windows 365 Cloud PC – Provisioning Policies that within the UI when you try to delete the policy, it will be grey out. The only way to delete the policy is to remove the Assignment Group (AAD Group assigned to the policy) and then delete the provisioning policy within UI. The motive of this blog series is PowerShell actions, and we will perform the two actions using that method.
Provisioning Policy (Copy ID)
We need the Windows 365 Provisioning Policy – ID to perform the AAD (Azure Active Directory) group un-assignment and delete operation. We need to copy this ID. Simply use the commandlet – Get-MgDeviceManagementVirtualEndpointProvisioningPolicy. Note if multiple CPC policy, select the ID that is relevant for deletion.
I hope you will find this helpful information for the un-assignment & deletion of the CloudPC provisioning policy using PowerShell. Please let me know if I have missed any steps or details, and I will be happy to update the post.
The overall view of the Performance (Utilization & Connection) for the entire Cloud PC deployed is available in MEM Portal -> Devices -> Overview -> Cloud PC performance
Cloud PC with connection quality issues
Overall, devices within the environment will be listed along with the connection quality details of all the Cloud PC. The categories classified are Good, Average and High. Metric includes RTT – Round Trip latency (lower values provide a better end-user experience), Remote Sign-in (time taken for an end-user to complete the sign-in to the Cloud PC) and Available Bandwidth (Internet bandwidth during the end-users connection attempt to the Cloud PC).
Cloud PC utilization
Overall, devices are listed within the environment to gauge the end-users utilization into High, Average and low categories. Depending upon the outcome, a business decision can be made on whether to resize the Cloud PC or decommission it. (Cost Savings!)
Session Performance
This report is essentially showing you the sign-in and sign-out time of the Cloud PC, along with the overall session length. This will show you how much time the end-user is spending on their Cloud PC.
Connection quality
On a specific device level, you can further deep dive into the metric. The breakdown of the RTT/Bandwidth and Sign-in time on a daily basis for the last 7 days.
Aggregated daily trends – The median average of the daily trends for a specific Cloud PC device
I hope you will find this helpful information for the fetch reports from your Windows 365 Cloud PC deployments and providing an excellent end-user experience. Please let me know if I have missed any steps or details, and I will be happy to update the post.
If you haven’t looked at my previous blog on PowerShell – Create Windows 365 Cloud PC Provisioning Policy, please check that out first. After creating the Cloud PC provisioning policy, the next step is to assign the Azure AD Group, which has the end-users and Windows 365 license assigned.
AAD Group (Copy – Object ID)
I have an AAD (Azure Active Directory) group called “Win365-Users” and assigned the Windows 365 Cloud PC Enterprise license. The important step here is to make a note of the “Object ID” of the AAD group you are planning to assign. Please make sure you copy this ID.
AAD Group
Provisioning Policy (Copy ID)
In the previous blog, when we created the Cloud PC provisioning policy, Azure will assign an ID. We need to copy this ID for the assignment. Simply use the commandlet – Get-MgBetaDeviceManagementVirtualEndpointProvisioningPolicy. Note if multiple CPC policy, select the ID that is relevant.
I hope you will find this helpful information for the assignment of the AAD group to a CloudPC provisioning policy using PowerShell. Please let me know if I have missed any steps or details, and I will be happy to update the post.
There are a significant amount of posts that talk about creating the Windows 365 Cloud PC Provisioning Policy. In this blog post, I will demonstrate how to create the provisioning policy using PowerShell and MS Graph API with beta modules on Windows 365 Cloud PC.
Connect to MS Graph API
Step 1 – Install the MS Graph Powershell Module
#Install Microsoft Graph Module
PS C:\WINDOWS\system32> Install-Module Microsoft.Graph.Beta
Step 2 – Connect to scopes and specify which API you wish to authenticate to. If you are only doing read-only operations, I suggest you connect to “CloudPC.Read.All” in our case, we are creating the policy, so we need to change the scope to “CloudPC.ReadWrite.All”
#Read-only
PS C:\WINDOWS\system32> Connect-MgGraph -Scopes "CloudPC.Read.All"
Welcome To Microsoft Graph!
OR
#Read-Write
PS C:\WINDOWS\system32> Connect-MgGraph -Scopes "CloudPC.ReadWrite.All"
Welcome To Microsoft Graph!
Permissions for MS Graph API
Step 3 – Choose between v1.0 (Generally Available) and Beta API versions. Note for Windows 365 Cloud PC the API calls are BETA.
#Beta User Check
PS C:\WINDOWS\system32> Get-MgBetaUser -UserId admin@wdomain.com
If you are doing on-premise network integration (Azure Network Connection) , then the following additional property and value is required. In my lab, I am leveraging the Microsoft Managed Network, so this is not required.
I hope you will find this helpful information for creating a provisioning policy using PowerShell. Please let me know if I have missed any steps or details, and I will be happy to update the post.
We create filters for the purpose of targeting specific Cloud PCs instead of all devices. In this post, I want to give you the details to go and quickly create the Cloud PC filters based on the SKU/Plan (Basic, Standard and Premium) in which Windows 365 Cloud PC is sold by Microsoft. The guidance below (copy/paste), you can quickly get them created in under 2 mins.
Overall filters (Microsoft Endpoint Manager)
Go to your Microsoft Endpoint Manager admin center – https://endpoint.microsoft.com and navigate to Tenant Administration – Filters
Filters
Create Filter
Click on Create
Enter the Filter Name – Cloud-PC-Basic
Enter Filter Description – The SKU Cloud PC Enterprise 2vCPU/4GB/128GB
Platform – Windows 10 and later
Rule Model – Equals – Cloud PC Enterprise 2vCPU/4GB/128GB
Cloud-PC-Basic
The SKU Cloud PC Enterprise 2vCPU/4GB/128GB
Cloud PC Enterprise 2vCPU/4GB/128GB
Cloud-PC-Standard
The SKU Cloud PC Enterprise 2vCPU/8GB/128GB
Cloud PC Enterprise 2vCPU/8GB/128GB
Cloud-PC-Premium
The SKU Cloud PC Enterprise 4vCPU/16GB/128GB
Cloud PC Enterprise 4vCPU/16GB/128GB
I hope you will find this helpful information for creating filters based on Windows 365 Cloud PC SKUs within your environment. Please let me know if I have missed any steps or details, and I will be happy to update the post.
In the Sep 2022 Windows 365 announcements, we had the alerts features been dropped for Windows 365. In my opinion, it was a much awaited feature for any enteprise that is trying out Windows 365 Cloud PC. This blog post will look at the alerts and their configurations.
Introduction
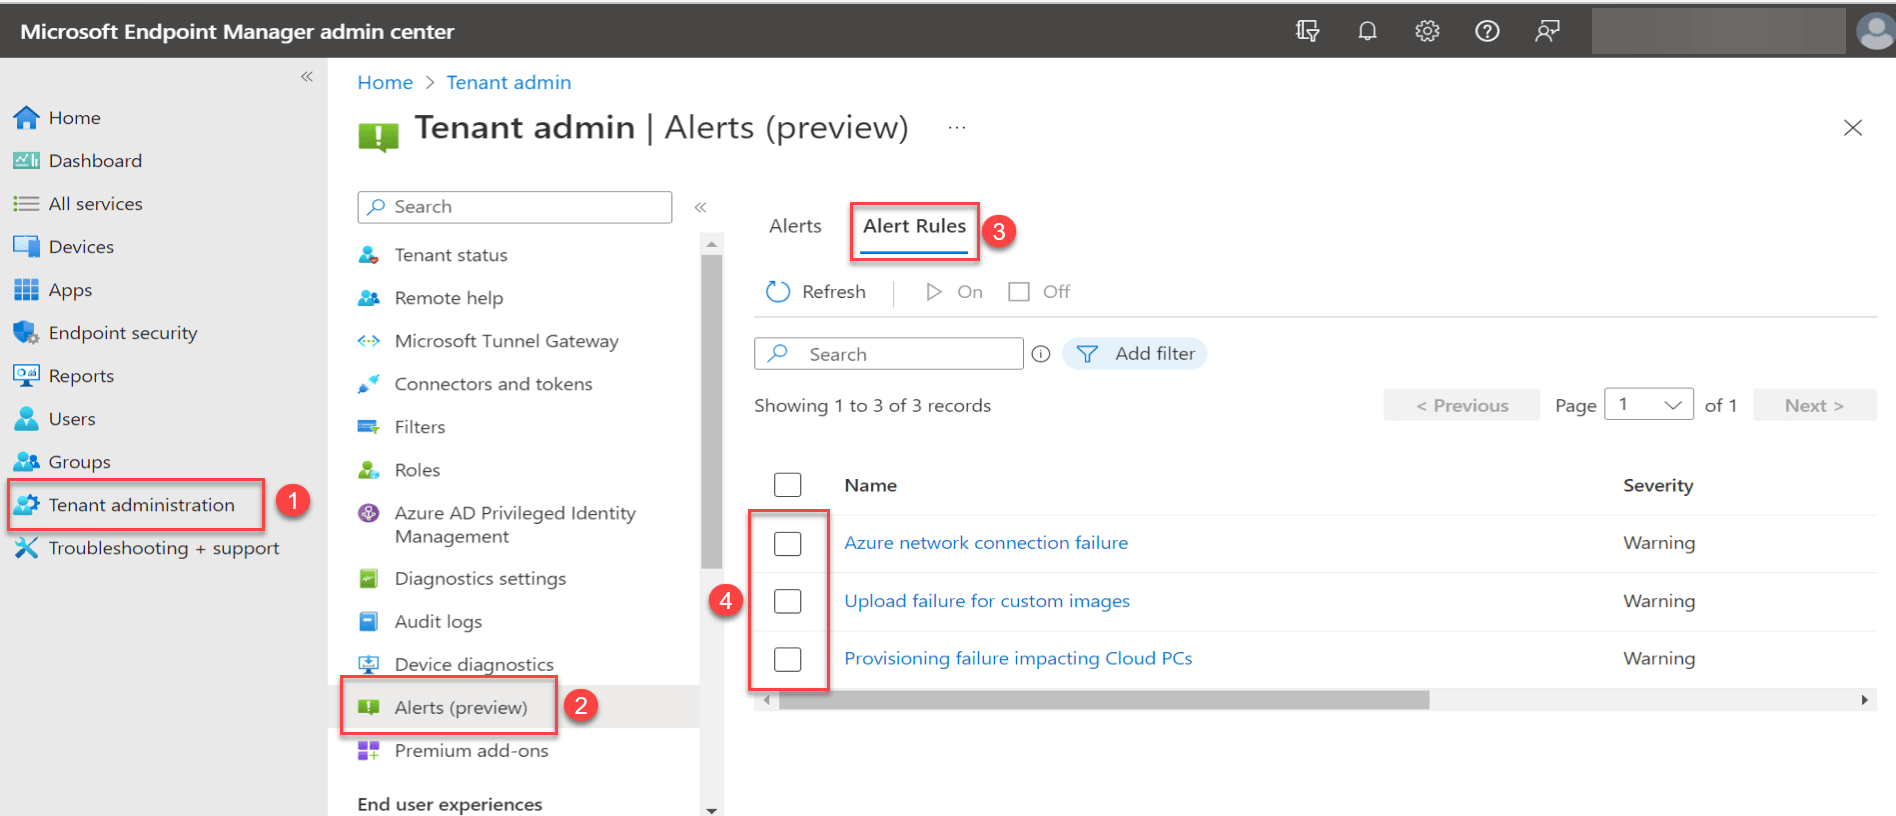
Let’s look at where is this feature available within the portal. Go to your Microsoft Endpoint Manager admin center – https://endpoint.microsoft.com and navigate to Tenant Administration – Alerts (preview) and click on Alert Rules.
Alerts – Windows 365 Cloud PC
Alerts Details
At present, we have 3 alert rules and I am positive more will follow soon as enteprise and customers raise feature request with Microsoft.
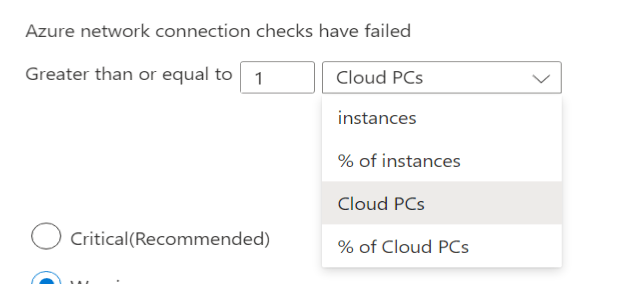
Azure network connection failure – Azure network connection checks have failed and are potentially impacting existing Cloud PCs and blocking the provisioning of new Cloud PCs. This alert is typically used when leveraging the Azure VNET to connect the Cloud PC with your on-premise network using (ExpressRoute or Site-2-Site VPN). Knowing if there are issues with the network connectivity is very important as it will block provisioning and other failures.
Azure Network connection failureCustomization of the threshold
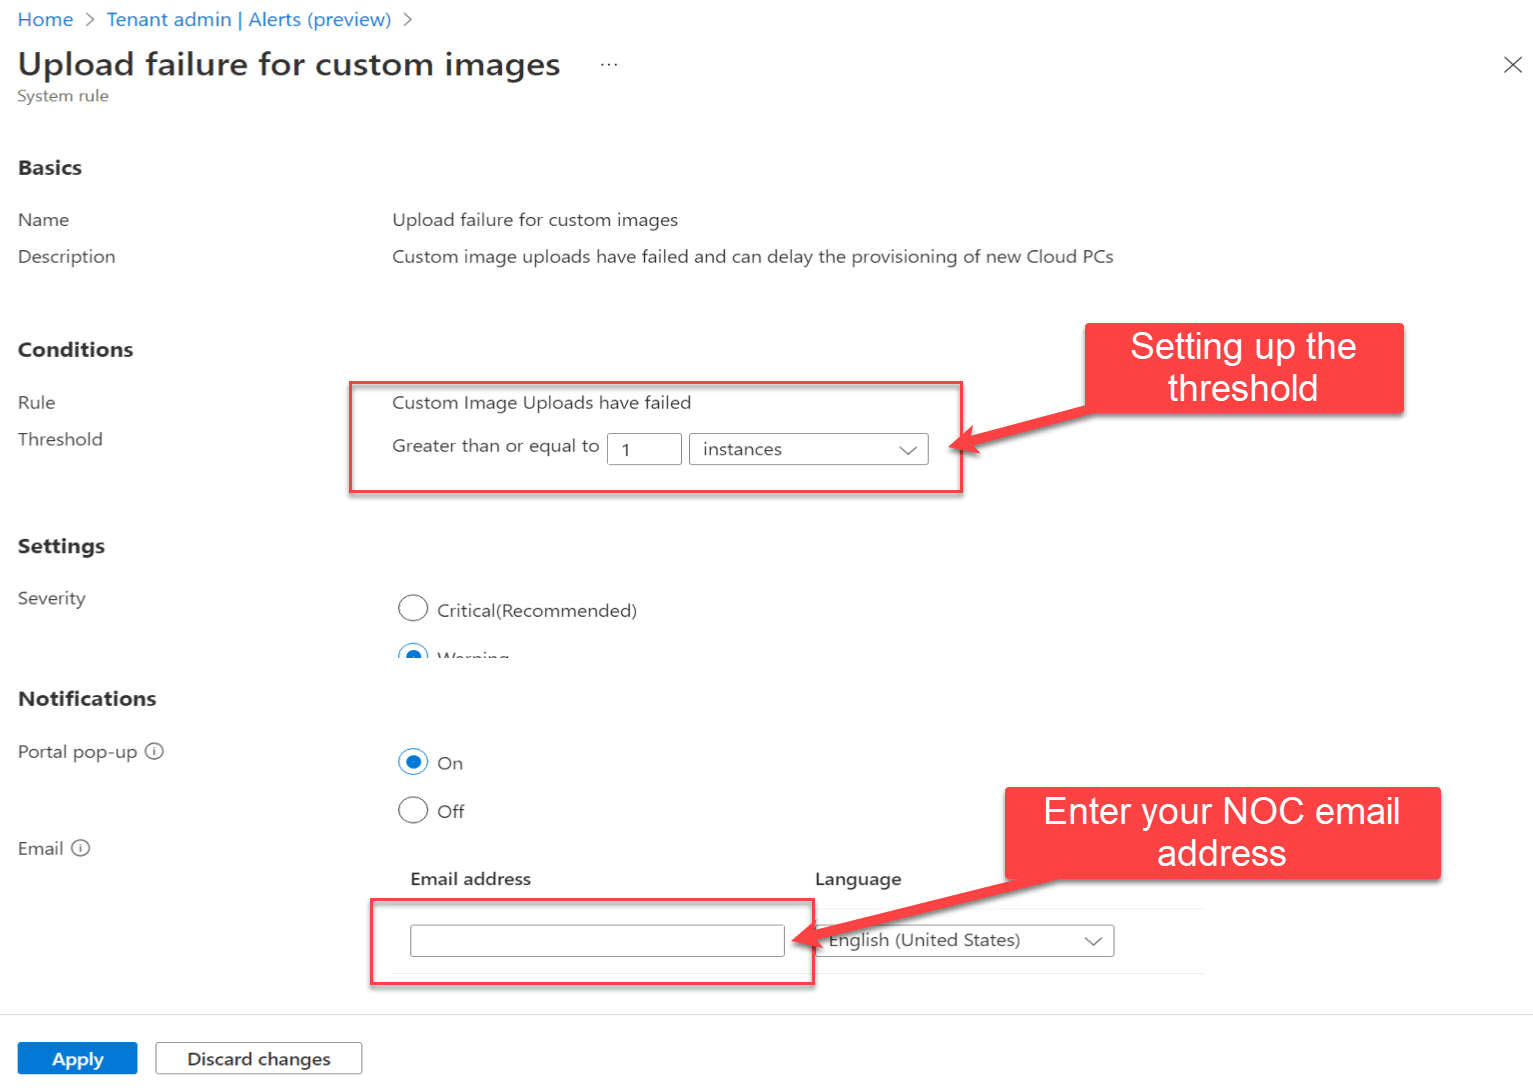
Upload failure for custom images – Custom image uploads have failed and can delay the provisioning of new Cloud PCs. This alert is typically used when leveraging the custom Azure gallery image or custom image for your Cloud PC. Knowing if there are issues with the image upload will help to understand why Cloud PC is not being created.
Upload failure for custom images
Provisioning failure impacting Cloud PCs – Provisioning has failed and is delaying end users from connecting to their Cloud PCs
Provisioning failure impacting Cloud PCs
Severity
You can tweak all three alerts based on Critical, Warning and Information. This tweaking will depend on your organizational needs and SLA requirements around each technology aspect available/failed.
Alerts – Triggered/Acknowledgement
Once the above configured alerts are triggered, they get listed under Alerts and the NOC teams monitoring the systems will have to acknowledge the alert and once resolved they need to select Resolved and close the alert.
Triggered – Alerts
I hope you will find this helpful information for setting up alerts for Windows 365 Cloud PC within your environment. Please let me know if I have missed any steps or details, and I will be happy to update the post.
Recent Comments