Tag Archives: Azure Compute Galleries

Build an AVD “Golden Image” with Terraform + Azure VM Image Builder (and publish to Azure Compute Gallery)

9 Feb

If you’ve been running Azure Virtual Desktop for a while, you already know the pain: keeping session hosts consistent is easy until you start chasing app versions, Windows Updates, Teams changes, and the “one missing dependency” that breaks someone’s day.

Microsoft calls this a golden image approach: bake your base OS + apps + config once, then roll it out to session hosts consistently. (Microsoft Learn)

In this post, I’m sharing a Terraform-based approach that builds a custom AVD image using Azure VM Image Builder (AIB) and publishes it to Azure Compute Gallery (ACG) so you can consume it in your AVD host pool automation. (Microsoft Learn)

Repo: avd-terraform-customimage (GitHub)

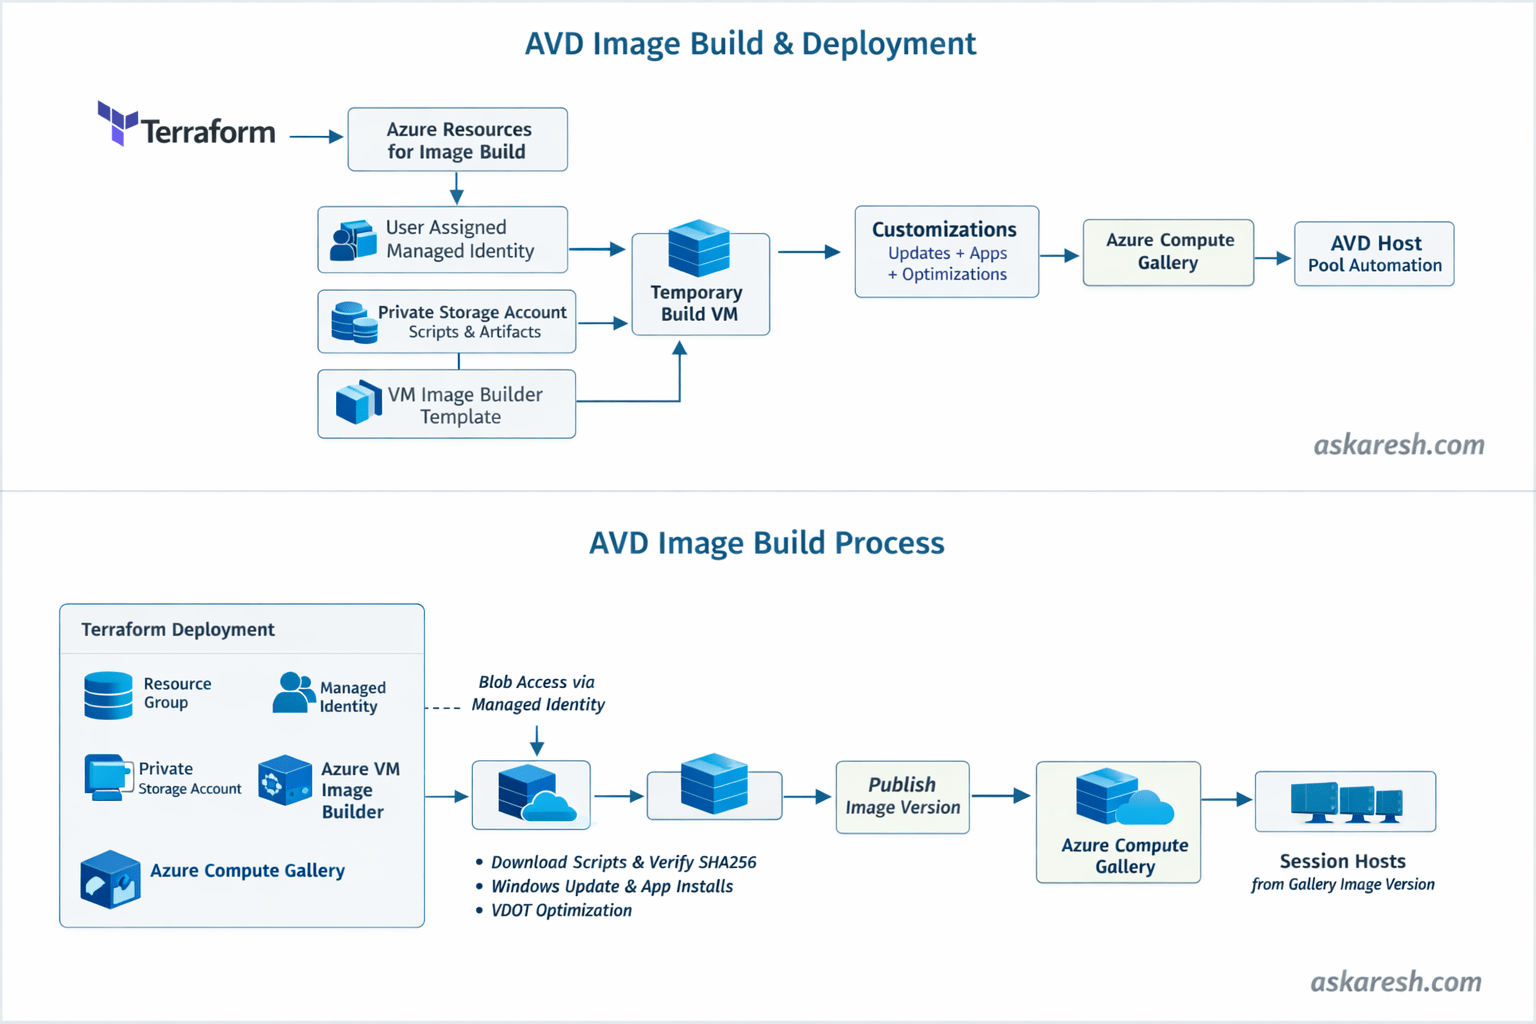
What we are building

High level flow:

  1. Terraform provisions the Image Builder “plumbing” (identity, storage, template, etc.)
  2. Azure VM Image Builder spins up a temporary build VM
  3. The build VM runs updates + optimizations + app installs (your choice)
  4. The final image gets published into Azure Compute Gallery
  5. You use that gallery image version when creating/re-imaging AVD session hosts (GitHub)

This repo uses a Windows 11 multi-session AVD + Microsoft 365 marketplace image as the starting point (so M365 and Teams are already there), then layers your customizations on top. (GitHub)

Why I like this approach

A few things in this repo are intentionally “enterprise friendly”:

  • No public script URLs / no long-lived SAS tokens: scripts are stored in a private blob container and downloaded using the Image Builder user-assigned managed identity. (GitHub)
  • SHA256 integrity checks: if someone tampers with your script artifacts, the build fails. (GitHub)
  • Deterministic image versioning: default version format is YYYY.MM.DD, with an option to override. (GitHub)
  • Optional optimization steps like Virtual Desktop Optimization Tool (VDOT) and FSLogix config (handy in AVD land). (GitHub)

Architecture

Pre-requisites

  • Azure subscription + permissions to create IAM assignments, storage, and image resources.
  • Terraform installed (repo expects Terraform + AzureRM provider versions aligned with the README). (GitHub)
  • Azure VM Image Builder basics: it supports starting from Marketplace/custom images and publishing to Azure Compute Gallery. (Microsoft Learn)

Deployment steps (what I run)

1. Clone the repo

git clone https://github.com/askaresh/avd-terraform-customimage
cd avd-terraform-customimage

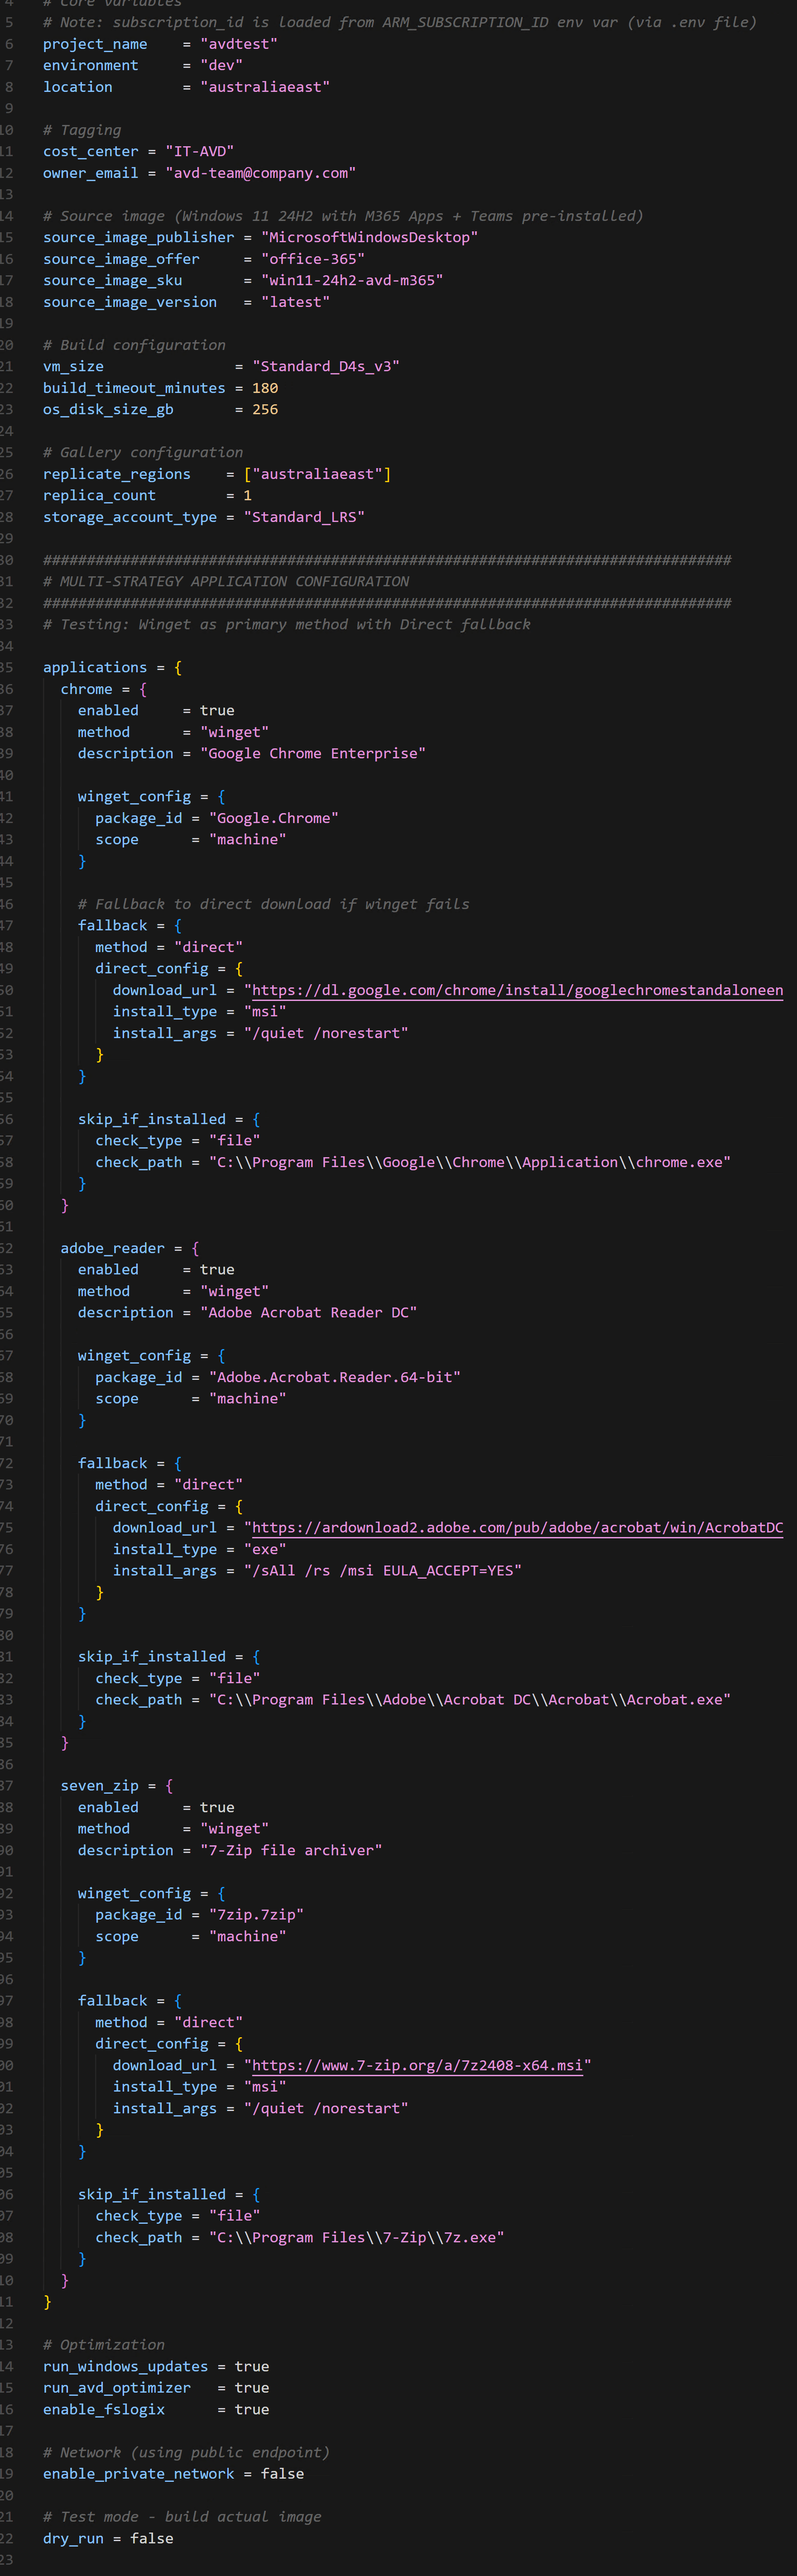
2. Configure variables

Start from the example and edit what you need (region, naming, feature toggles, etc.). (GitHub)
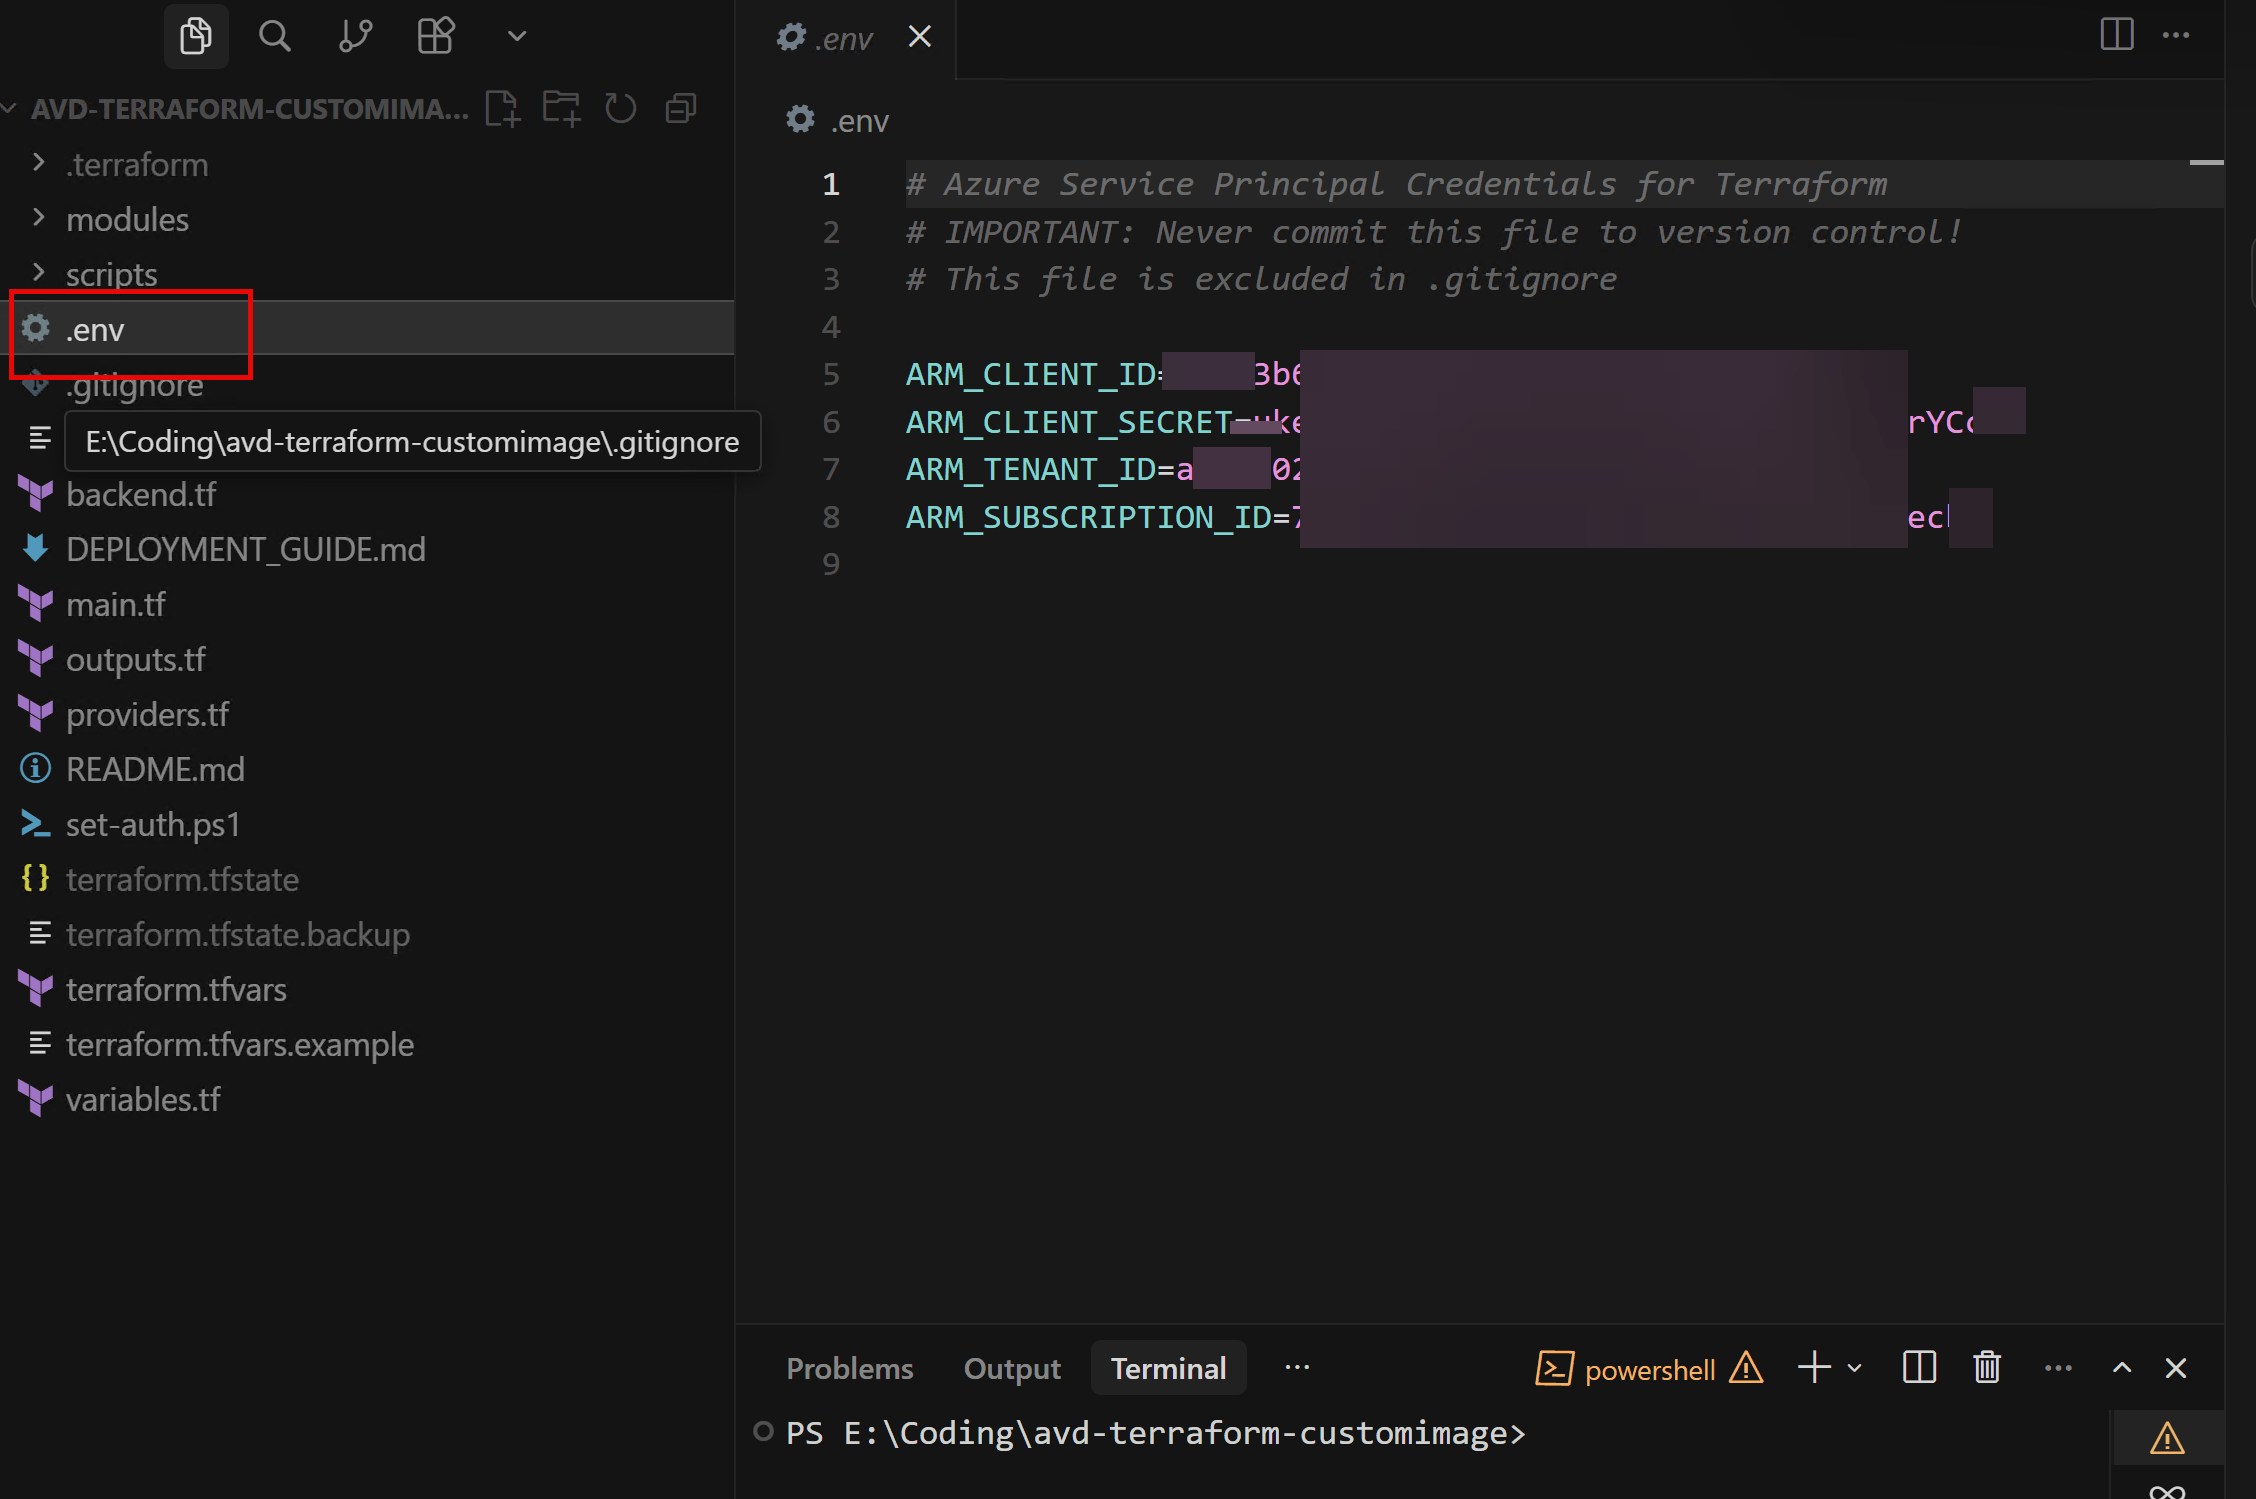
3. Authenticate

Use your preferred method (interactive az login locally, or service principal in CI/CD). The repo also calls out using .env locally and keeping secrets out of Git. (GitHub). The PowerShell script set-auth.ps1 calls these environment variables.

4. Terraform init / plan / apply

terraform init -upgrade
terraform plan -out image.tfplan
terraform apply image.tfplan

Important note: Terraform provisions the Image Builder template, but doesn’t wait for the build to finish. (GitHub)

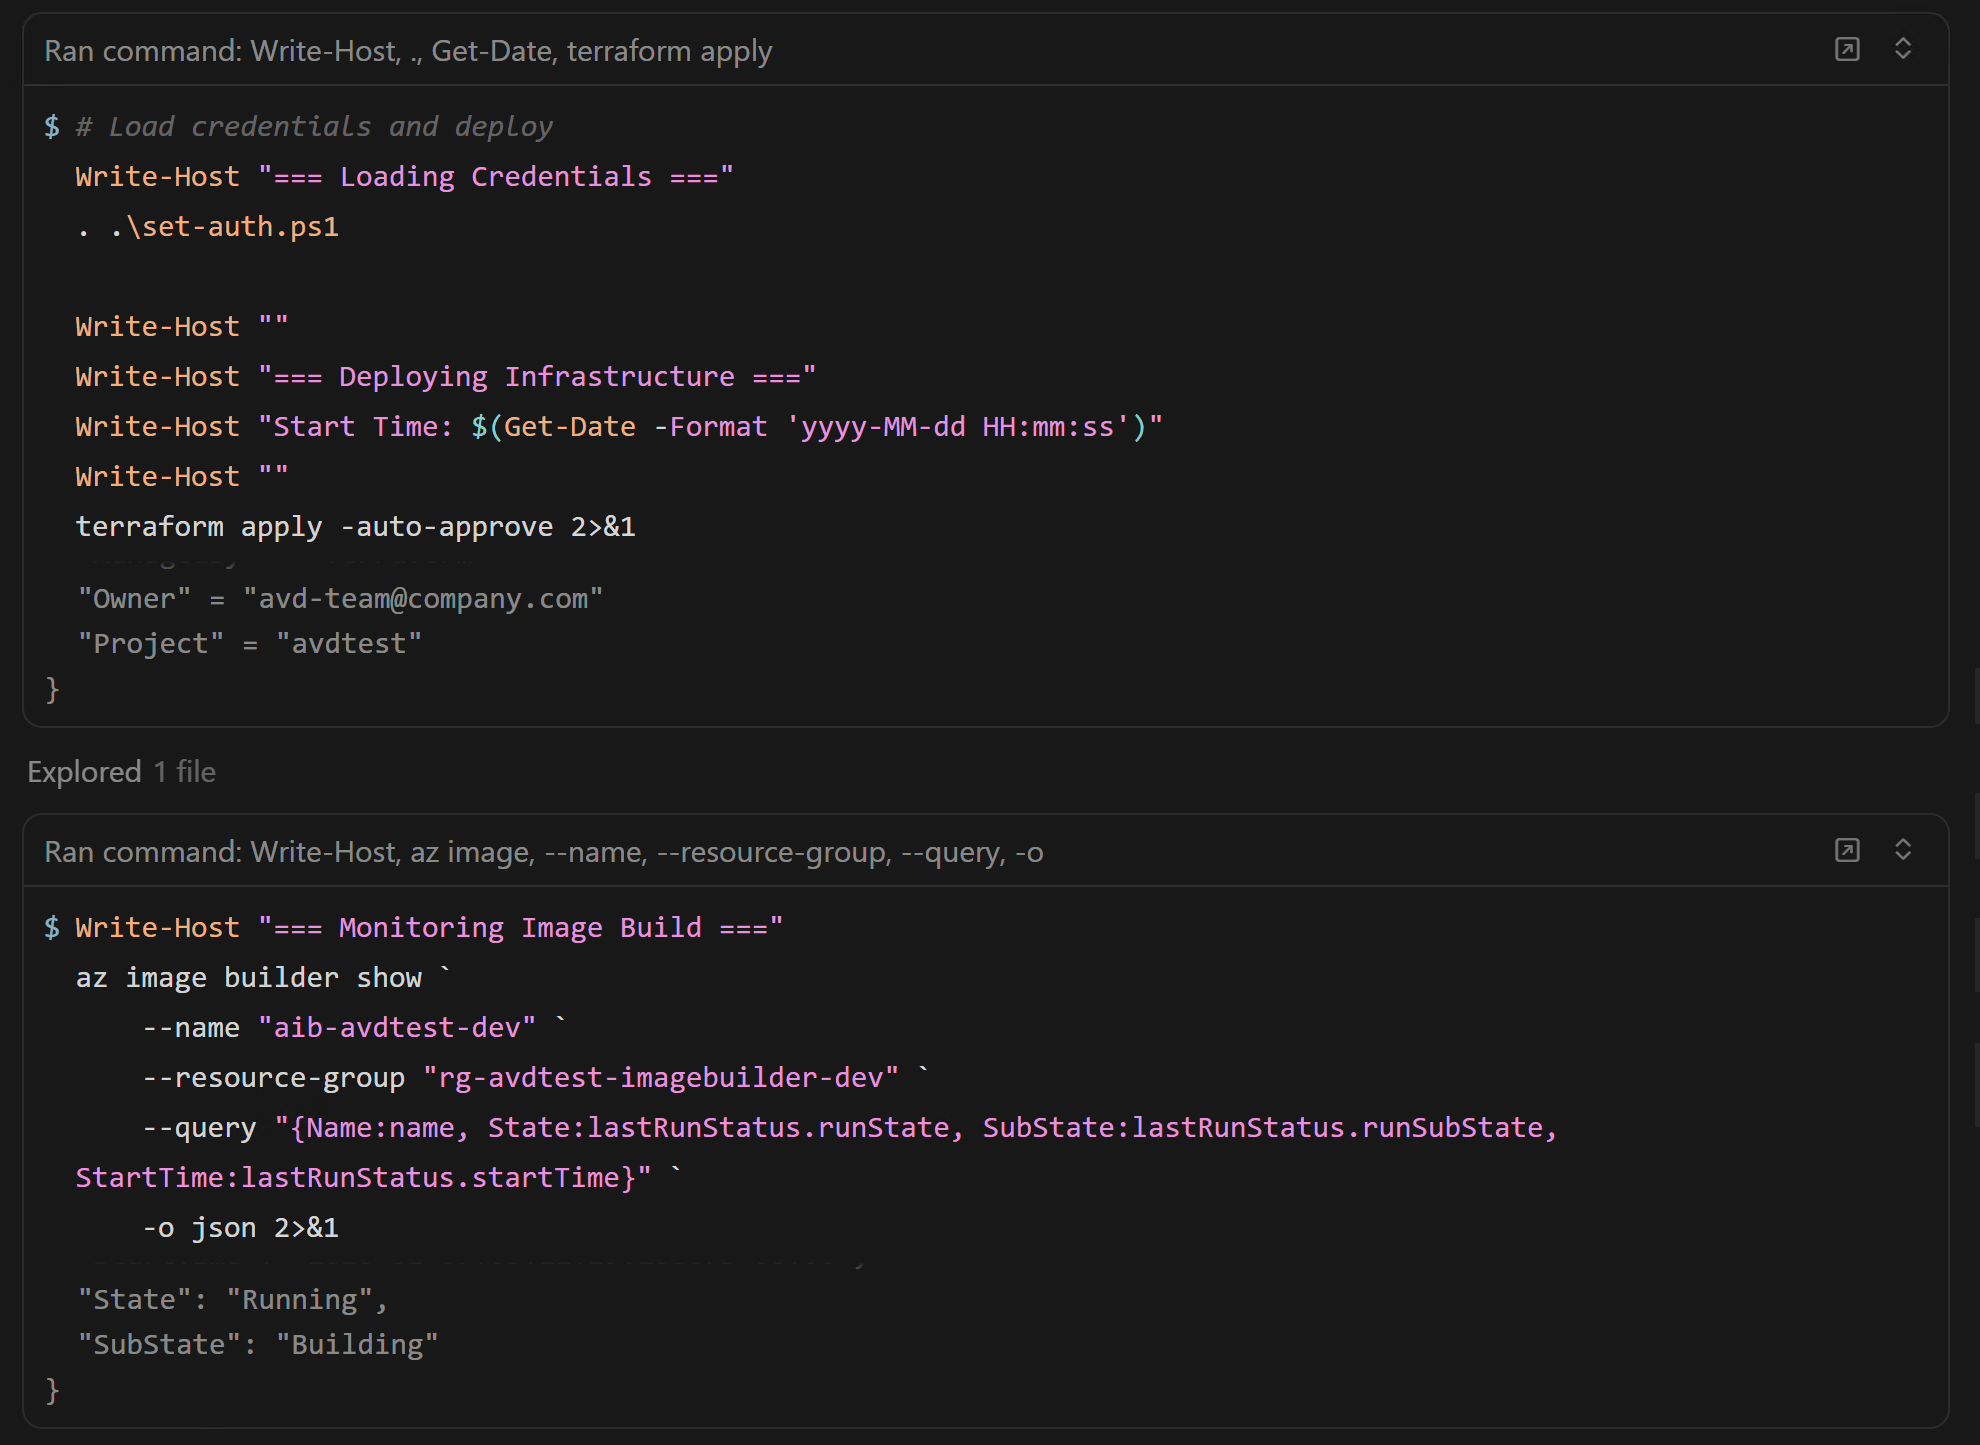
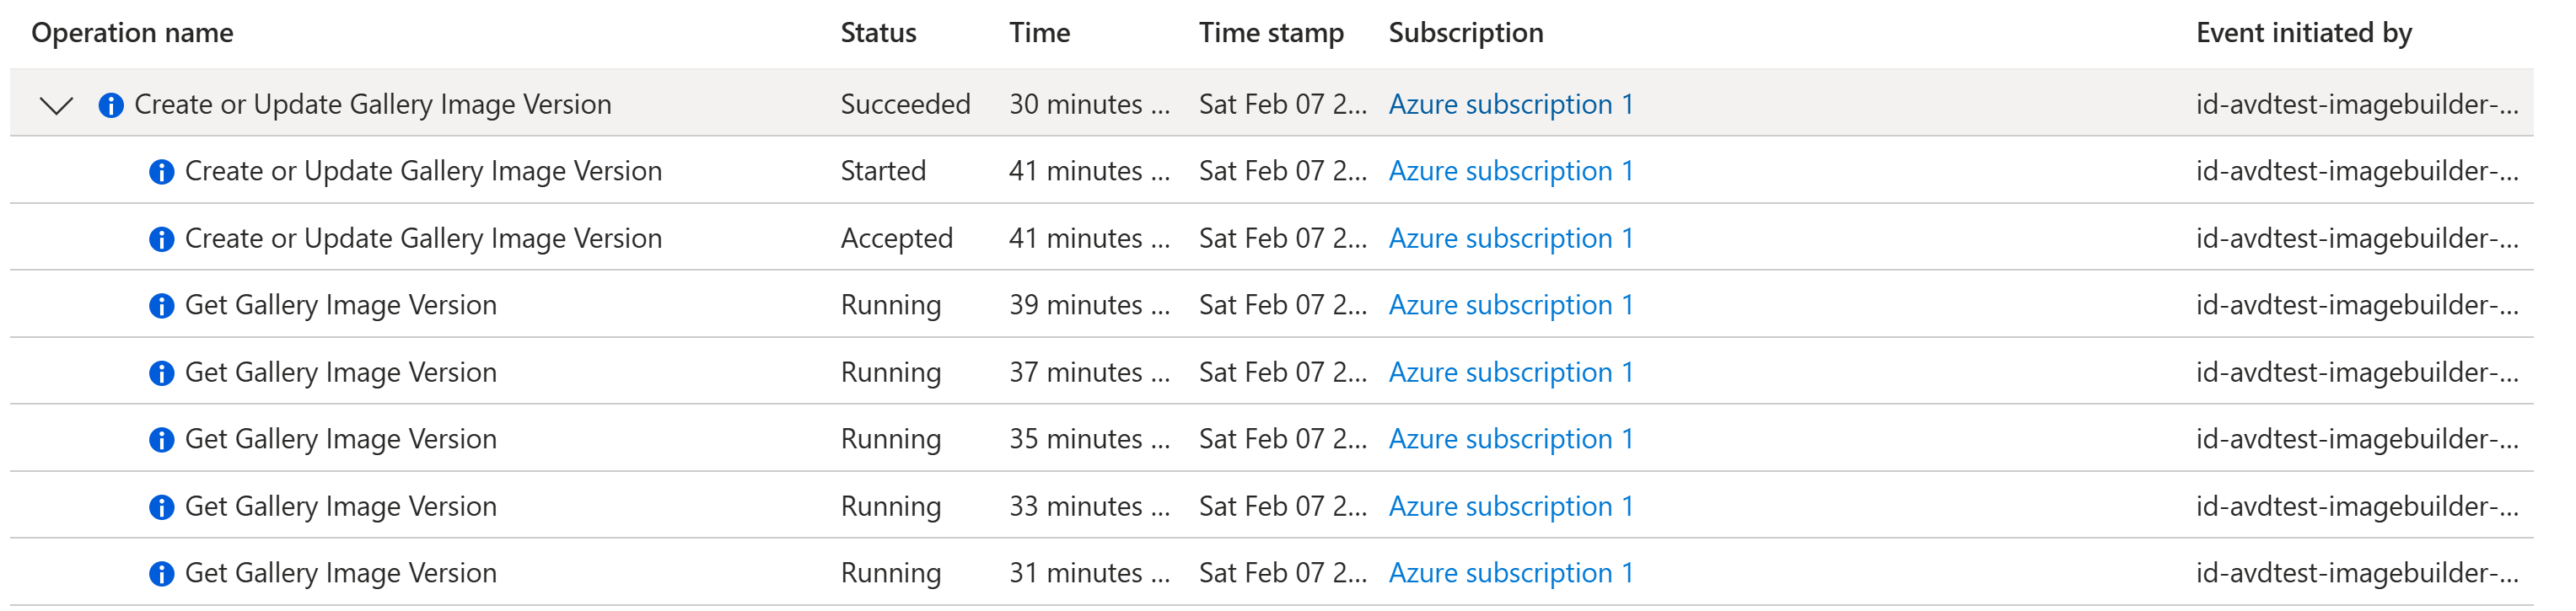
5. Trigger + monitor the image build

You can monitor runs in the portal, or with Azure CLI:

  • az image builder show-runs shows run outputs for the template. (Microsoft Learn)
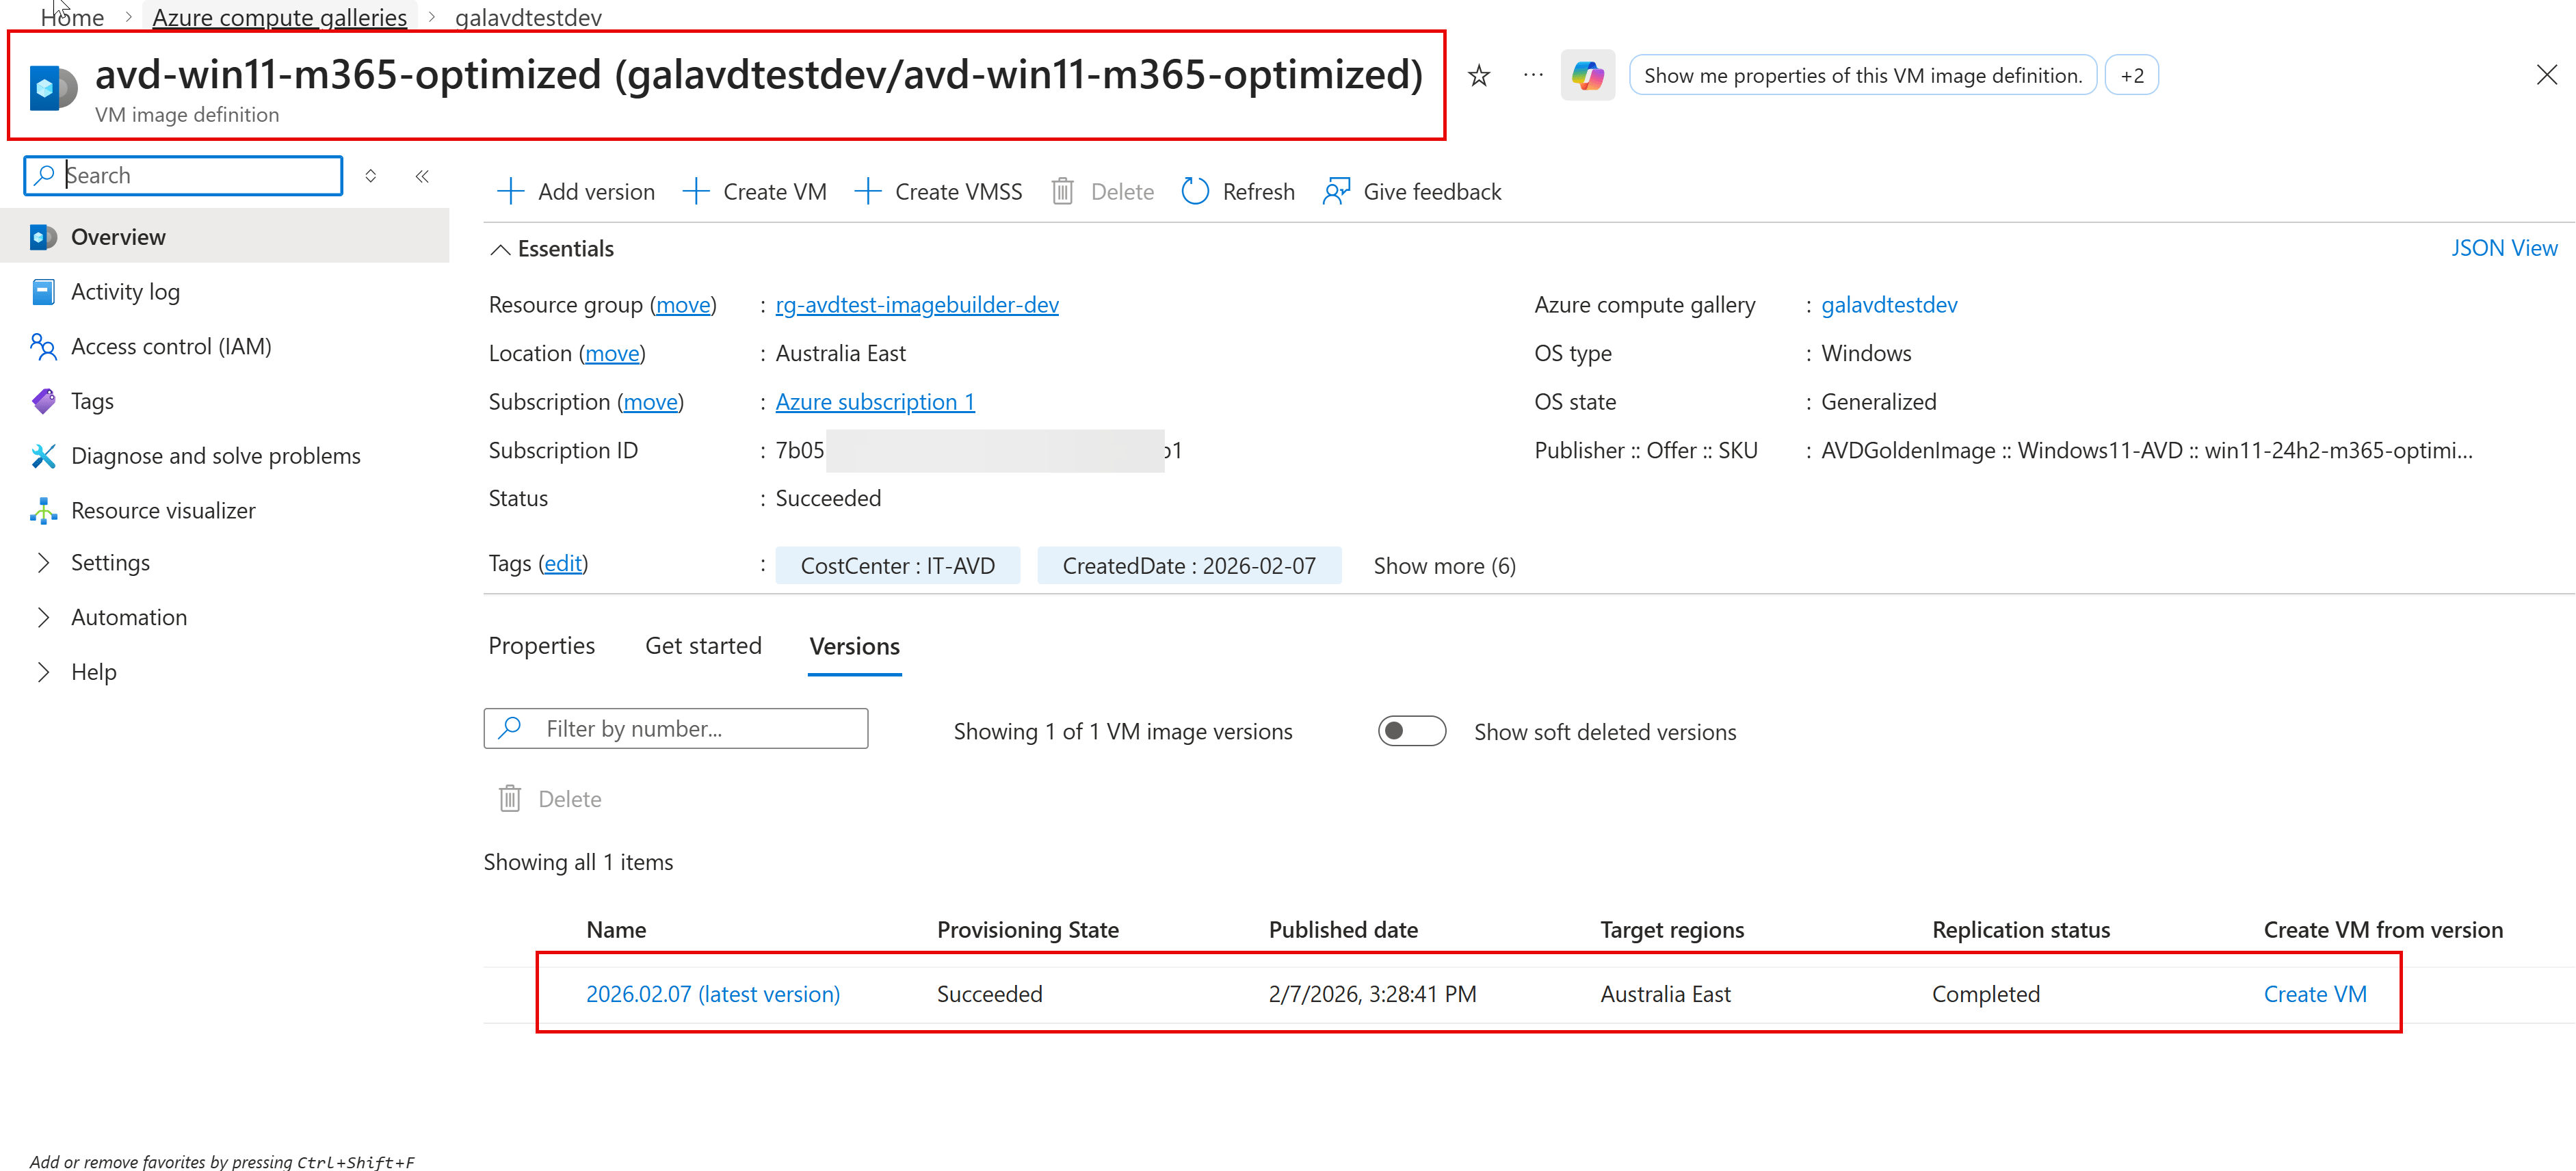
Once the build completes, you’ll see a new image version in Azure Compute Gallery. ACG is designed to manage/share images and versions cleanly across environments. (Microsoft Learn)

Customizing applications (the fun part)

This repo supports multiple install strategies with fallback (so you’re not stuck when winget is blocked in some environments):

  • winget (default)
  • direct download (fallback)
  • offline packages from storage
  • psadt for complex enterprise apps (GitHub)

Gotchas / things to keep in mind

  • Build time: expect ~45–75 minutes depending on Windows Updates and app installs. (GitHub)
  • Template updates: Image Builder doesn’t really do “in-place template updates” the way you’d hope—plan on the “replace template” pattern when you change major parts. (Microsoft Learn)
  • Networking: if you go private networking / locked-down egress, make sure your update/app endpoints are reachable (or use offline packages). (GitHub)
  • AVD consumption: this pipeline publishes the image version—your AVD session host deployment should point to that exact gallery version. (GitHub)

Where this fits in your AVD build

If you already deploy host pools/workspaces/scaling plans via Terraform, think of this repo as the image factory that feeds your host pool automation. (Build image → publish to gallery → deploy session hosts from that version.) (GitHub)

Wrap up

That’s it — repeatable AVD image builds, versioned in Azure Compute Gallery, with a setup that avoids public script endpoints and keeps things predictable. (GitHub)

I hope you find this helpful information for building and maintaining an AVD golden image using Terraform + Azure VM Image Builder. If I have missed any steps or details, I will be happy to update the post.

Thanks,
Aresh Sarkari

Azure Virtual Desktop – Apply monthly Microsoft Security Cumulative Updates on the golden image with Azure Compute Galleries

14 Nov

We have numerous articles showcasing how to create the golden master image to deploy within the Host Pool. This blog post will showcase how to perform recurring monthly security patch updates within the golden master image and push that into your Host Pools within Azure Virtual Desktop.

  • Pre-requisites
  • Azure Compute Galleries – Create VM
  • Console to Golden Image (RDP or Azure Bastion)
  • Install the Microsoft Latest Cumulative Update (LCU)
  • Sysprep (Generalize and Shutdown)
  • Capture the Virtual Machine
  • Azure Compute Galleries – New Version
  • Drain and remove old session host vms

Feature Whishlist

If Microsoft is listening – requesting the feature of leveraging the Update Rings from Micorosft Intune can be integrated into applying the quality updates from #Intune on Microsoft Windows 10/11 Multi-session

Pre-requisites

The assumption here is that you already have a golden image and existing versions available. Below is an example from Azure Computer Galleries of a Windows 11 Multi-session and current running version 0.0.2 within my Host Pools. (Note its an already generalized image – See the OS State)

Azure Compute Galleries – Create VM

The first step here is to update the golden image with the monthly Microsoft Cumulative Security update, and we want to create a new virtual machine from the existing version of 0.0.2. (Background version 0.0.2 include the October 2022 Latest Cumulative Updates)

Now you will be presented with a Create VM wizard

Select Next – Disk Settings

Select Next – Networking Settings

Select Next – Management Settings

Select Next – Monitoring Settings

Select Tags

Select Review & Create the Virtual Machine – Golden Image.

#Tip – On the rare occasion that the creation of the virtual machine fails, in one instance, I had forgotten to perform Sysprep on the existing version in Azure Compute Galleries (e.g. 0.0.1). In such scenarios, create a virtual machine from the previous version number you know that works well. After updating the new vm from existing image version we can take a snapshot of that before sysprep and keep. It will be helpful if the vm due to any reason get destroyed during sysprep.

Console to Golden Image (RDP or Azure Bastion)

We now have the newly created golden image from the existing version 0.0.2 within the Azure – Virtual Machines blade listed and status=Running.

Download the RDP file and console into the Virtual machine – Win11MSGI04 (Note, as previously mentioned, this is a bad practice in a production environment as it needs public IP for access. The best approach here is to leverage Azure Bastion and click on the Bastion option, and securely console the VM via browser)

Install the Microsoft Latest Cumulative Update (LCU)

In our scenario, we shall install the November 8, 2022—KB5019980 (OS Build 22621.819) for Windows 11 22H2 Multi-session. Note I am using the Powershell pswindowsupdate module, but you can download and offline install the Windows update (LCU, which also includes SSU)

Get-WUList -MicrosoftUpdate

Install the Update

Get-WindowsUpdate -KBArticleID KB5019980 -Install -AutoReboot | Out-File "c:\Temp\$(get-date -f yyyy-MM-dd)-WindowsUpdate.log" -force

Post the reboot validate the windowsupdate log output to determine whether the patch was installed successfully. Optionally perform Disk Clean.

Sysprep (Generalize and Shutdown)

We are onto our final step before the capture. Perform Sysprep on the image and shutdown

%WINDIR%\system32\sysprep\sysprep.exe /generalize /shutdown /oobe

#Tip – Make sure the end state of the virtual machine status = Stopped (deallocated) before following the next step of Capture. Sysprep is the most crucial step if you forget this, your provisioning will fail with an error.

Capture the Virtual Machine

We will capture this image into Azure Compute Galleries

Next Capture wizard

#Tip – As we selected “Delete” post creation, the virtual machine will not appear within the Azure – Virtual Machines. Below is the task for the deletion.

Azure Compute Galleries – New Version

We can now see the latest version showing up 0.0.3 post the capture process. This version is now ready to be added to the AVD – Host Pools

Add Session Host Virtual Machine (New security patch version 0.0.3)

After clicking on Add, it will open the “Add virtual machine to a host pool” wizard

Select Next – Virtual Machines

Next enter the tags of your choice and hit Create

Drain and remove old session host vms

Put the old session host virtual machines in the drain and remove the virtual machine. This step will depend on how much time log-off all the end-user sessions will take on the VM.

Next, if all the sessions are drained. Select the old virtual machine and select Remove.

Note – When you hit remove for the session host virtual machine within the Host Pools blade, it will only remove the virtual machine from there. You will have to go into the Azure – Virtual Machines blade and stop and delete the virtual machine from there. The good thing here is that as we had selected delete disk/network (checkbox) during creation, it will delete everything associated with the VM.

#Tip – As a precautionary step, you can delete the virtual machine after 2-3 days after production stabilizes in case you have to revert and manually add the VM’s back into the host pool

A big thanks to Mahammad Kubaib for reviewing this blog post based on his previous experience. I hope you will find this helpful information for performing monthly cumulative security updates on your Azure Virtual Desktop – Host Pools. If you want to see a Powershell version of the same activity, leave me a comment below or on my socials. Please let me know if I have missed any steps or details, and I will be happy to update the post.

Thanks,
Aresh Sarkari